
DataChange rows
Import data
Import copies rows from a file or from another table into a table on your connection. Everything happens in one panel: you choose the source and the destination, adjust the columns, review the SQL, and press Execute. Nothing is written to the database until you do.
You can import from:
- Files: CSV, Excel (
.xlsx), Parquet, Avro and Arrow - Database objects: tables, views, materialized views and synonyms on any connection
You can import into an existing table, or into a new table that the import creates.
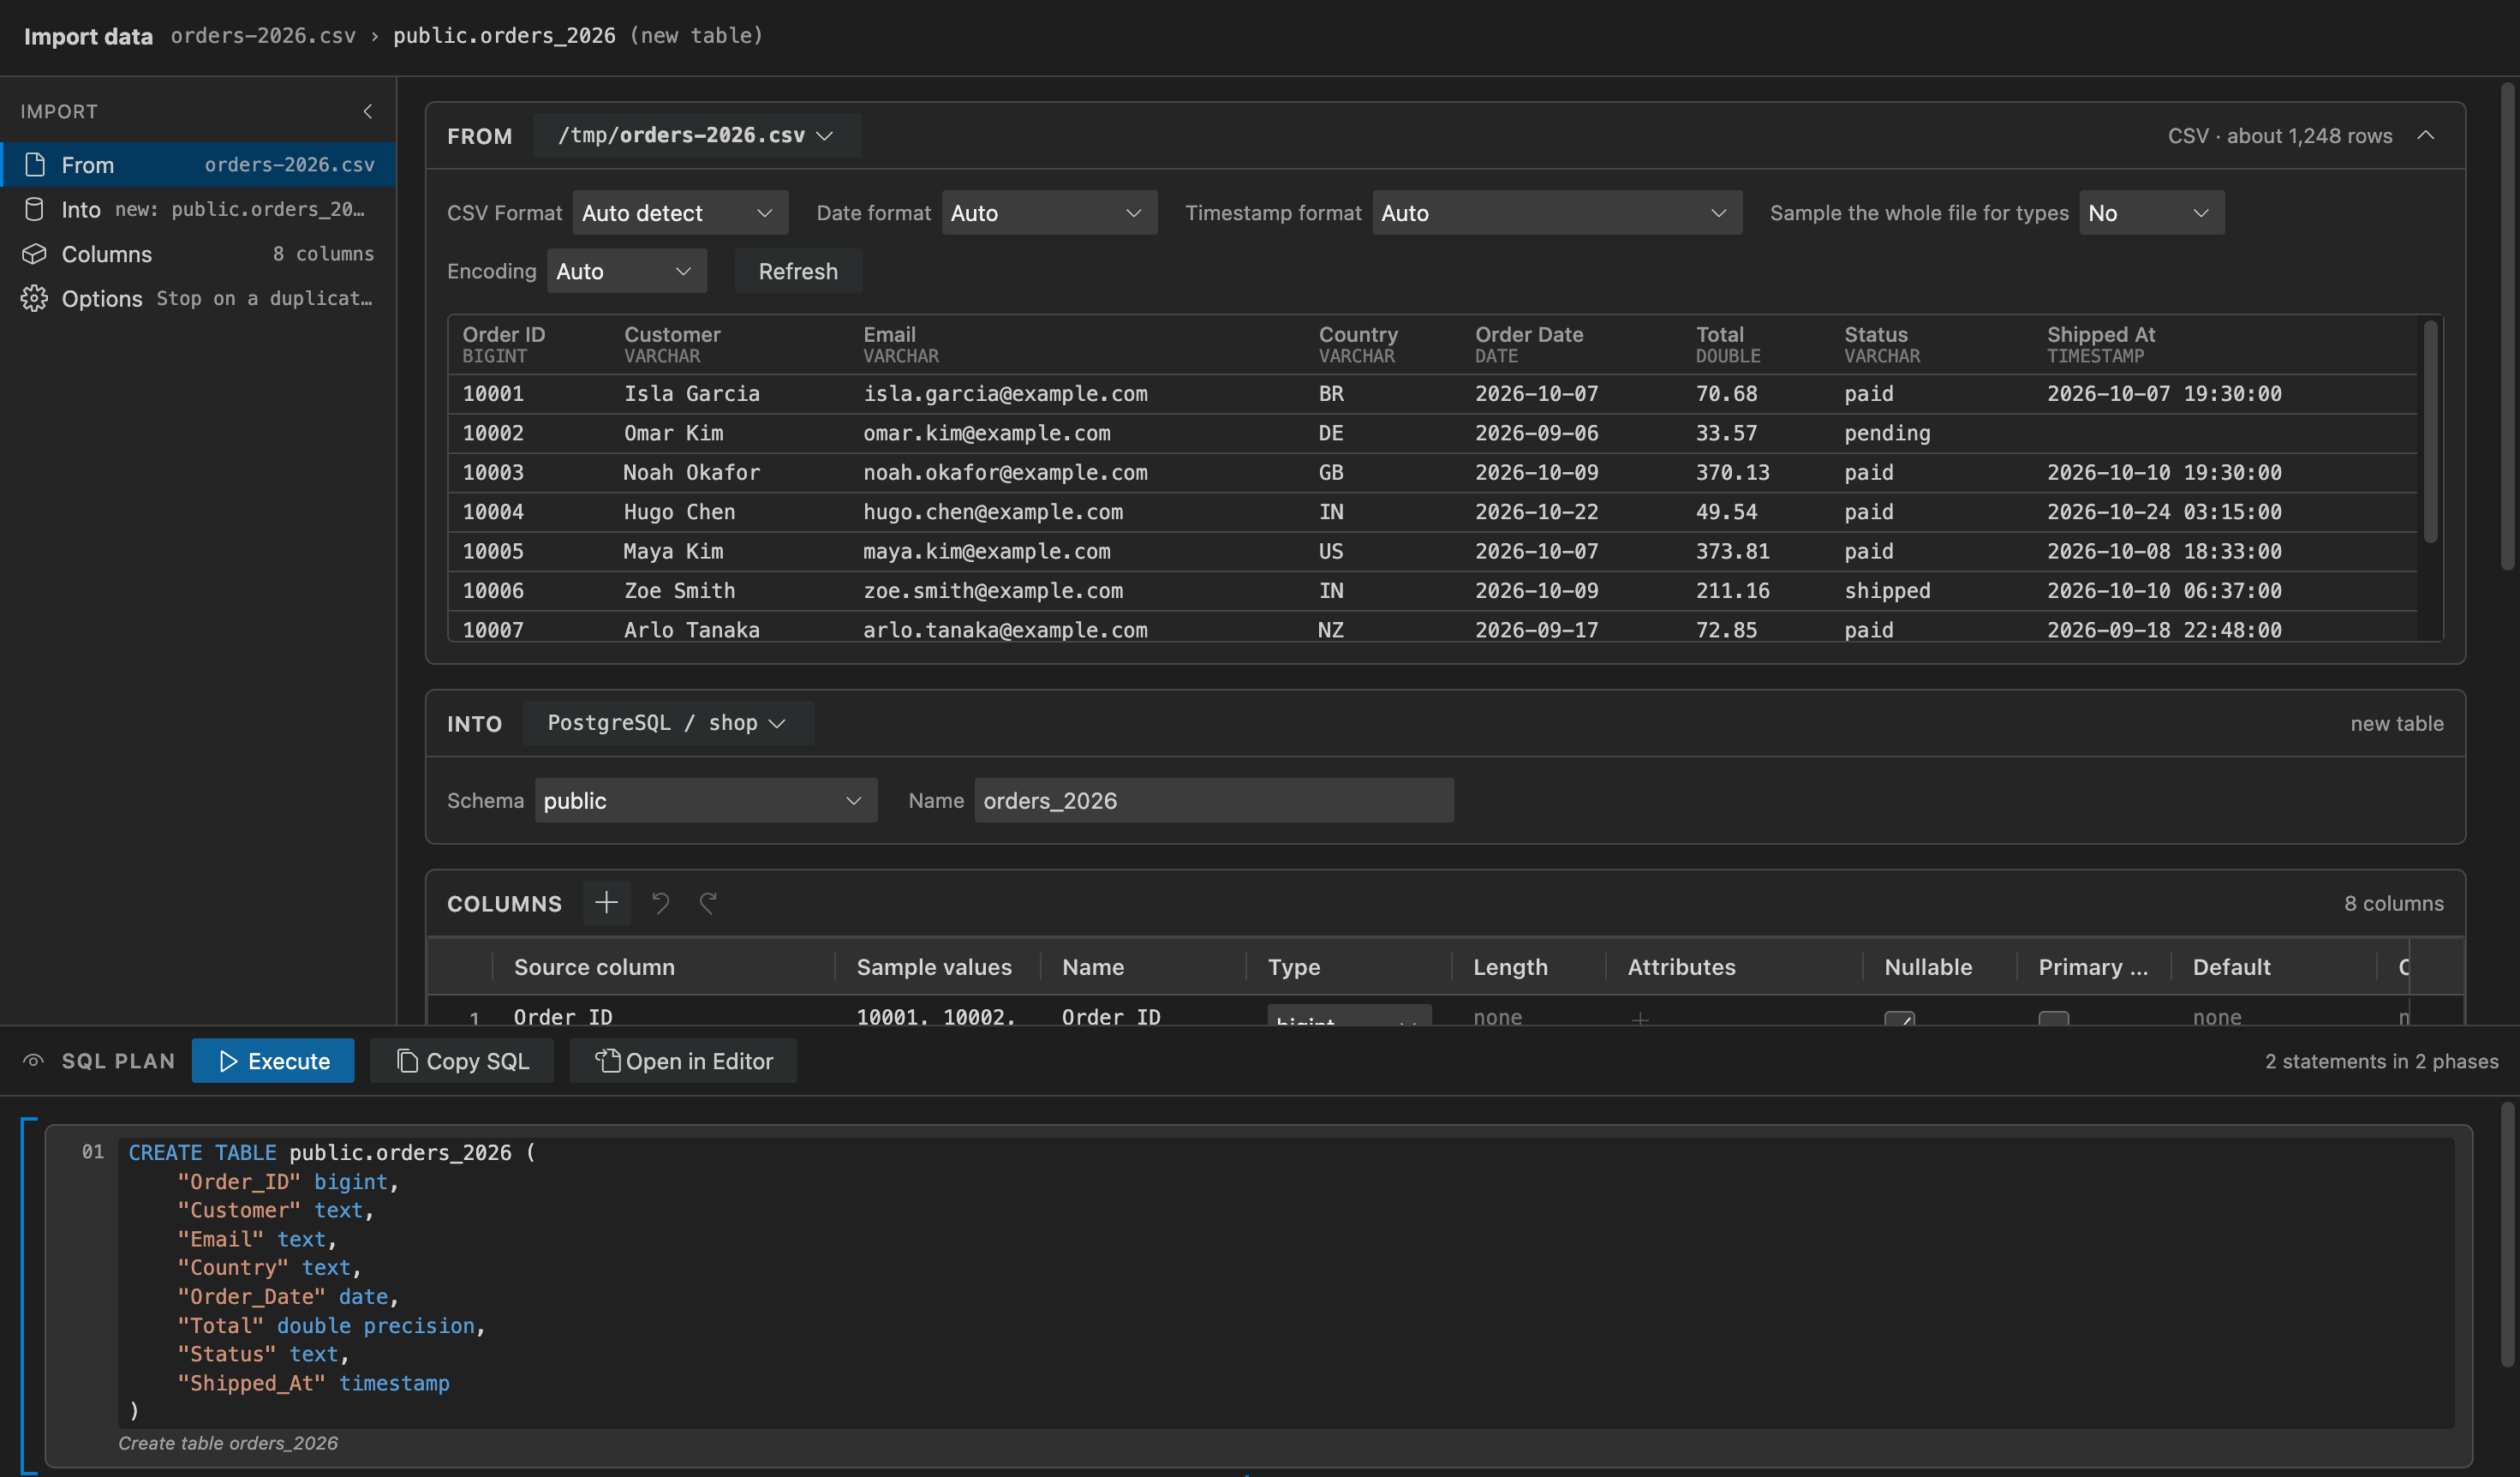
The panel has four sections, From, Into, Columns and Options, with the SQL plan in a dock at the bottom. The rail on the left shows what each section holds and marks a section with a problem. Click an entry to jump to its section, or click the chevron to fold the rail.
Open the import panel
Section titled “Open the import panel”There are four ways to open it:
- A table: in the DB Explorer, right-click a table and select Import Data. The table is set as the destination.
- The Tables folder: right-click a Tables folder and select Import Data. The destination is a new table in that schema.
- The Command Palette: run DBCode: Import Data, then pick the destination connection and schema.
- An empty table: when a table’s data view has no rows, click Import data in the empty grid.
The From section asks where the data is coming from: click Choose file… or Choose table…. Once a source is chosen, its path shows in the section’s header; click it to choose another. The chevron at the right of the header folds the section away.
Click Choose file… to choose a file. The section then shows the file’s options and a preview of the first 10 rows, with the type DBCode detected under each column header. The header shows the file type and about how many rows it has, and Refresh reads the file again. While a file is being read, the section shows Reading source.
Every change to an option reads the file again and refreshes the preview and the columns.
CSV options:
| Option | What it does |
|---|---|
| CSV Format | Auto detect works out the header row, delimiter, quote and escape characters for you. Choose Specify to set them yourself. |
| Header Row | Whether the first line holds the column names (with Specify). |
| Delimiter | The character between values (with Specify). |
| Quote Character | The character that wraps values (with Specify). |
| Quote Escape | The character that escapes a quote inside a quoted value (with Specify). |
| Date format | How dates are written in the file, picked from examples such as 31/12/2026 or 12/31/2026. Auto (the default) reads most layouts, but when no date in the file settles which part is the day, as with 01/05/2026, it reads the day first. Pick the format for files that put the month first, or that spell out the month. |
| Timestamp format | How date and time values are written, picked from examples such as 31/12/2026 23:59:59 or 12/31/2026 11:59 PM. Auto (the default) reads most layouts; pick one for times without seconds or when the day and month could be either way round. |
| Sample the whole file for types | Yes reads every row to detect the column types, instead of a sample. Slower on large files, but a value far down the file can no longer break the import. |
| Encoding | Auto, UTF-8, UTF-16 or Latin-1. |
The date, timestamp, sampling and encoding options apply whether the format is detected or specified.
Excel files: a workbook with more than one sheet shows a Sheet picker. Each import reads one sheet.
Parquet, Avro and Arrow files have no options.
Database
Section titled “Database”Click Choose table… and pick a table, view, materialized view or synonym. The picker starts on the panel’s connection; use its back button to pick from another connection. The section shows a preview of its first 10 rows.
The Into section’s header shows where the rows go, and says new table or existing table at the right. Click the connection in the header to switch between them.
- Existing table: select Choose table… to pick a table on the panel’s connection. The header shows the table’s path, and the section shows how many rows it holds now.
- New table: select New table. The table is created on the panel’s connection and database. Choose the Schema and type a Name. If a table with that name already exists, the field says so and Execute waits until you change it. The table is created when you press Execute, together with the rows, and not before.
Columns
Section titled “Columns”The Columns section has one row per source column, in source order: the source column name, sample values, and the destination side. The section’s header counts the columns that will be imported, and for an existing table, how many are mapped.
Into a new table
Section titled “Into a new table”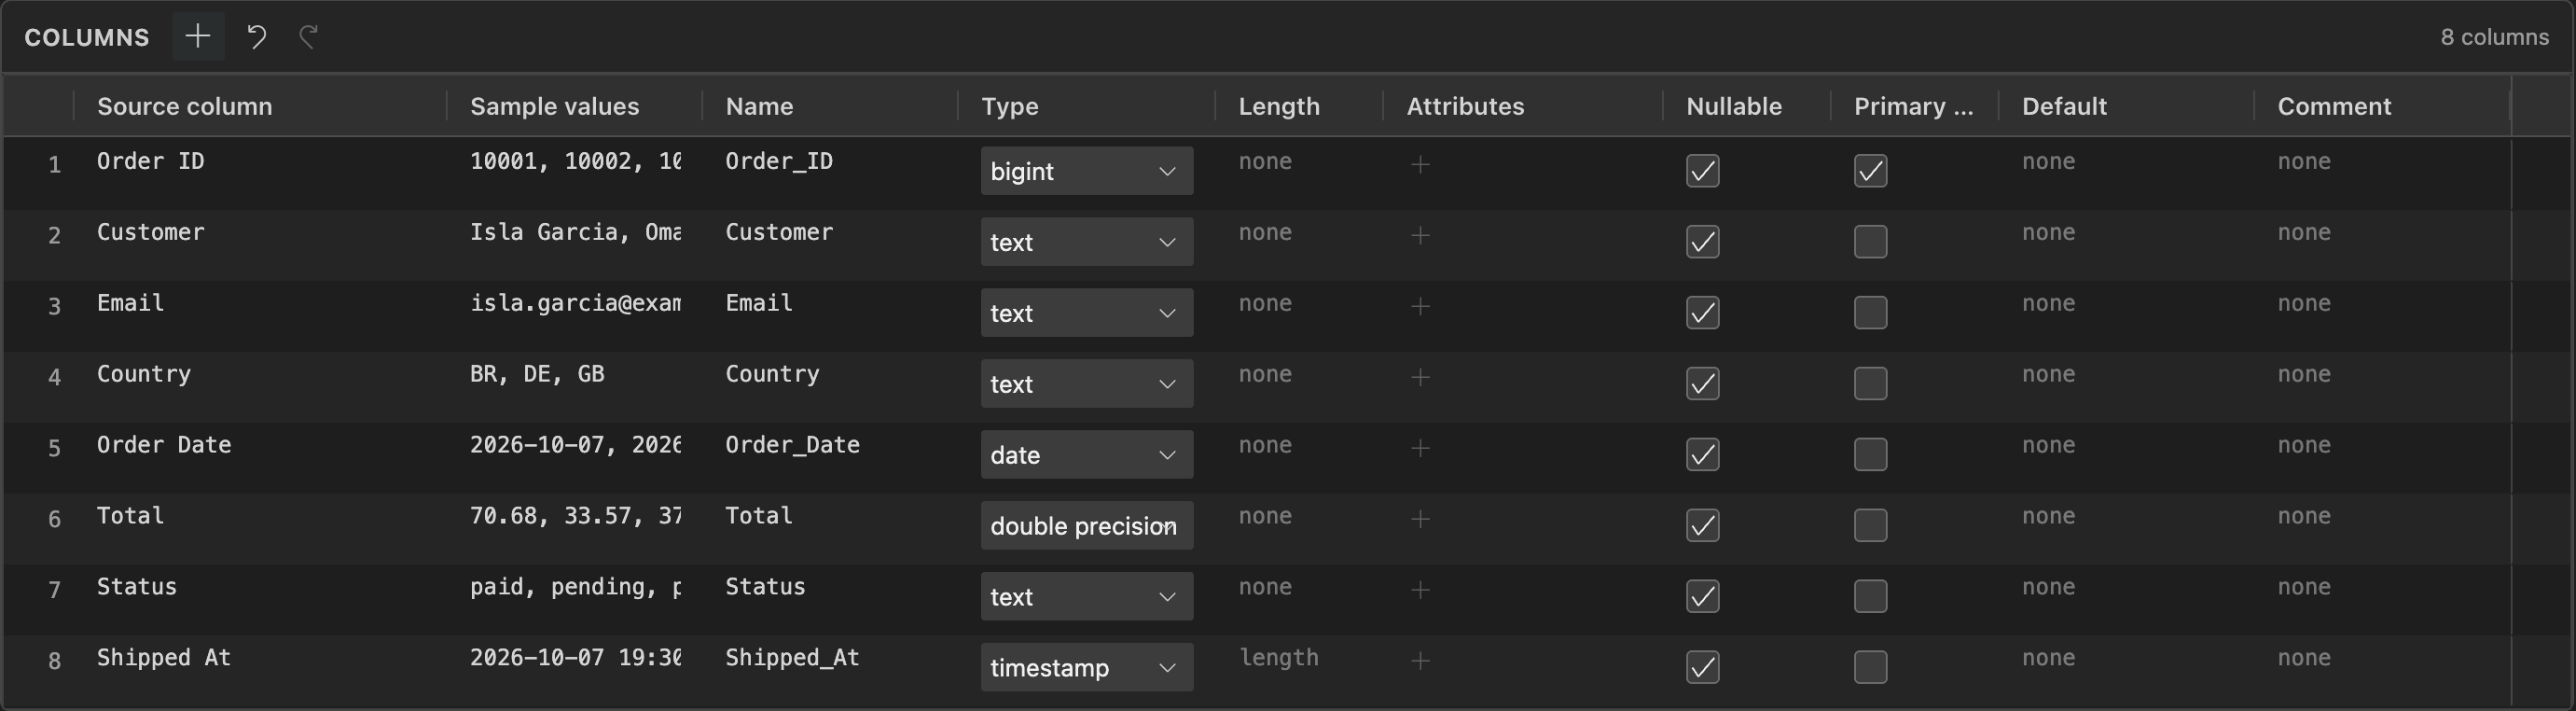
Each row defines a column of the new table: Name, Type (from the database’s own list of types), Length where the type takes one, Attributes (the database’s own modifiers, such as identity), Nullable, Primary key, Default and Comment.
- Cleaned names: DBCode turns source names into safe column names. Letters and digits from any language are kept, spaces and symbols become
_, a name that starts with a digit gets a leading_, and two names that would clash get_2,_3. For example,Order IDbecomesOrder_ID. The source name stays visible on the left, and you can type a different name. - Types: DBCode picks the closest type the database offers for each source column. Change any of them in the grid.
- Primary key: tick Primary key on the rows that make up the new table’s primary key.
- Add column: the + in the section’s header adds a column the source does not have, such as an
id. Give it a name and a type, then mark it as the key and make it an identity, or give it a default. The database fills it, because the import leaves added columns out of the INSERT. An added column that is not nullable and has neither a default nor an identity is flagged, because nothing would fill it.
Into an existing table
Section titled “Into an existing table”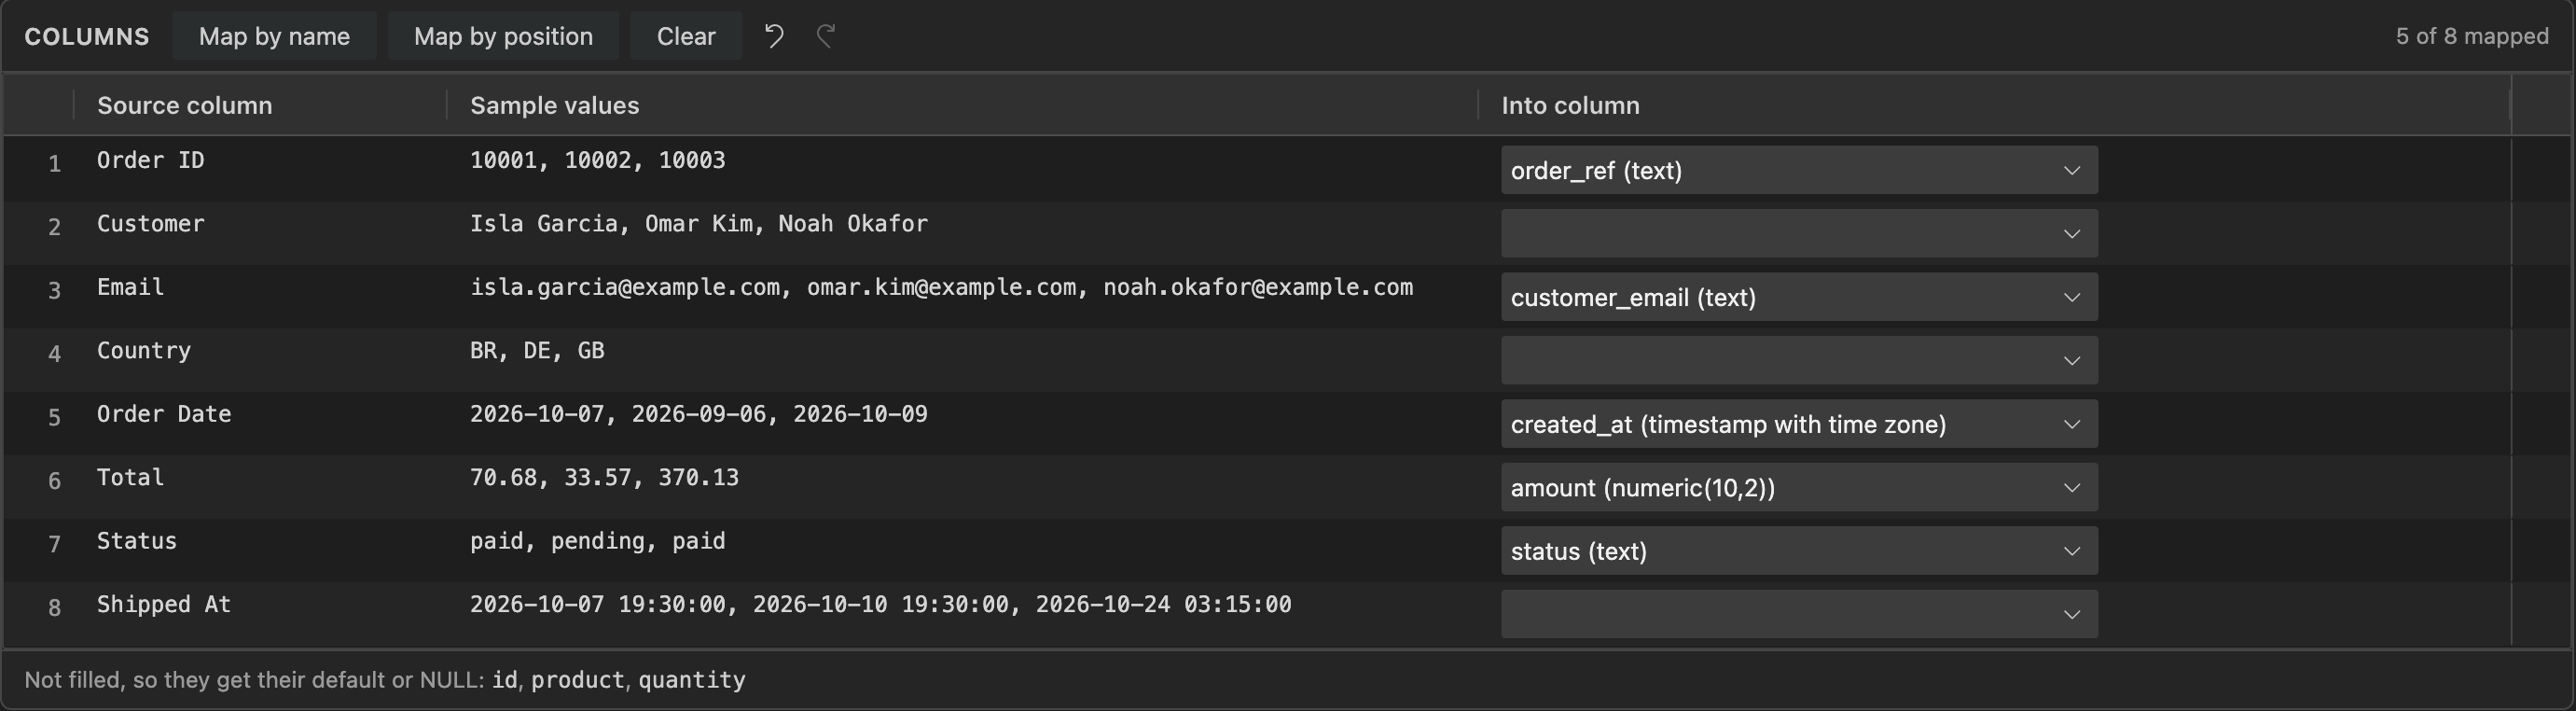
Each row has an Into column picker that lists the table’s columns with their types. A row with no Into column is skipped.
- Map by name matches columns by name, ignoring case, spaces,
_and-. This runs when the panel loads. - Map by position matches the first source column to the first table column, and so on.
- Clear unmaps every row.
Under the grid, Not filled, so they get their default or NULL lists the table columns that nothing is mapped to. A table column that is required, with no default, and has no source column mapped to it is flagged, and so is a table column mapped twice.
Skipping a column
Section titled “Skipping a column”Hover a row and click Remove this row to leave that source column out of the import. The row stays in the grid, struck through, and Include brings it back.
Problems show under the cell they belong to, and a pill in the panel header counts them; click it to jump to the first one. Undo and Redo (the arrows in the section’s header, or Cmd/Ctrl+Z and Shift+Cmd/Ctrl+Z) work on every change in the grid.
Options
Section titled “Options”
| Option | What it does |
|---|---|
| When a row is already in the table | Error (the default) reports the row as failed. Skip leaves the row out and keeps the existing one. Replace overwrites the existing row with the imported one. |
| Match on | Existing table, with Skip or Replace. The columns that decide whether a row is already in the table. It starts with the table’s primary key. Match on does not check that the chosen columns have a unique index; if they do not, the database’s error is shown as is. |
| Empty the table first | Under Before importing, existing table only. Deletes every row before the import. The plan shows the statement with a Destructive badge. |
| Continue past failed rows | Under Errors. When a row fails, carry on with the rest instead of stopping. |
| Batch size | How many rows are sent in each INSERT. The default is 1000. |
Skip and Replace are available on PostgreSQL, MySQL, SQLite, DuckDB, SQL Server and Oracle. On other databases they are disabled, and hovering them shows why. Replace always needs key columns to find a duplicate, and SQL Server and Oracle need them for Skip too. When there are none, the option is disabled with Needs a key column. Tick Primary key on a row for a new table, or choose Match on columns for an existing one.
Review and import
Section titled “Review and import”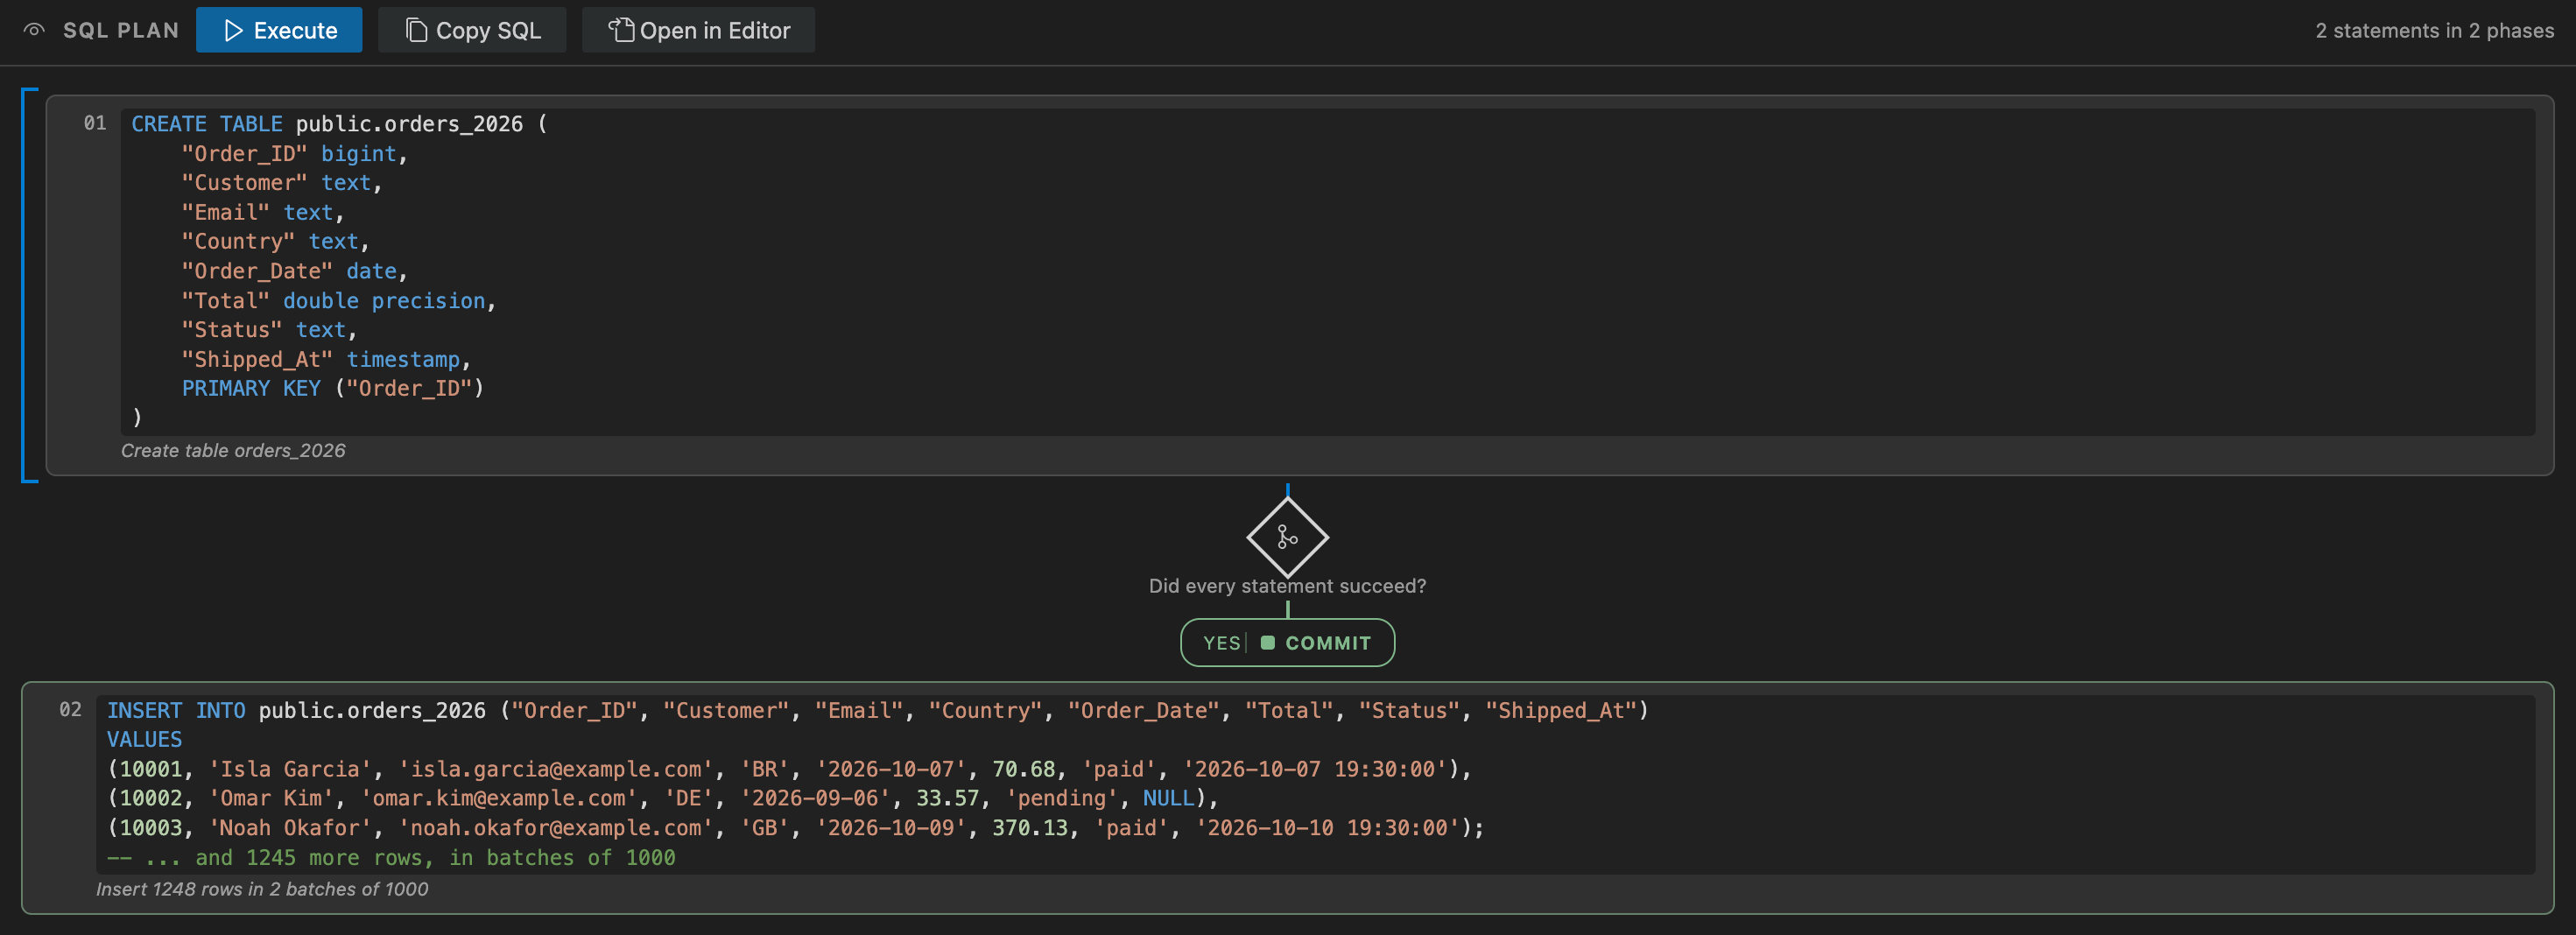
The SQL plan dock at the bottom shows the plan: the CREATE TABLE for a new table, the statement that empties the table when you chose Empty the table first, and the INSERT with the first sampled rows, in the exact form your database will run. The plan updates as you edit. Copy SQL copies it and Open in Editor opens it in a SQL editor.
Click Execute, or press Cmd/Ctrl+Enter. When Execute is not available, hover it to see why, for example while there are problems to fix or no source is chosen.
Importing is a Pro feature. Without Pro, the whole panel works and shows the plan, and the Execute button reads Import is Pro and offers the upgrade. Importing into the sample database is free.
Progress and cancel
Section titled “Progress and cancel”While the import runs, each statement shows its progress. The source is read in full first, then a bar shows the rows written and the batch number. Click Cancel to stop after the current batch. Batches already written stay in the table.
Results
Section titled “Results”When the import ends, the dock shows what happened: how many rows were imported into which table, and, when rows failed, each failed row’s number with the database’s message. Copy errors copies that list. Open table opens the destination table’s data, and New import starts again with the same source, into the table you just imported into.
If the new table was created but no rows could be written, the table stays and the result says it is empty. If the table was emptied first and no rows could be written, the result says so too.