DataRead and explore
Explore and analyze
Data Explore lets you interactively analyze any query result or table data. It automatically classifies columns as dimensions or measures, profiles the loaded rows, and renders charts as you click fields. Date fields can be bucketed by day, week, month, quarter, or year, and dimension values can be clicked to filter the view.
Opening Explore
Section titled “Opening Explore”There are two ways to open the Explore panel:
- From the data grid: Click the telescope icon in the grid toolbar on any query result or table data.
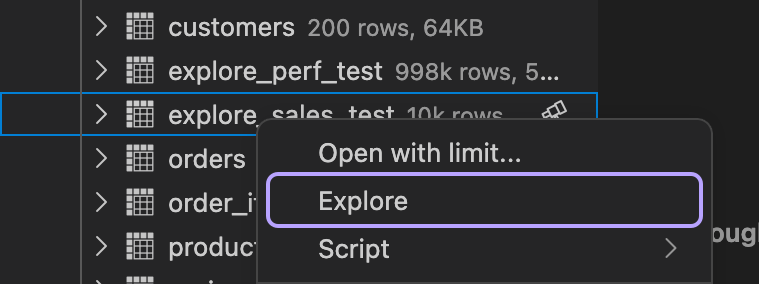
- From the DB Explorer: Right-click a table and select Explore. DBCode queries the table and opens the panel with the loaded row set.
Layout
Section titled “Layout”The Explore panel is organized into several areas:
- Breadcrumb bar: At the top, shows the current drill path with the table name and active filters. Each segment is clickable for back navigation. The AI assist toggle is also here.
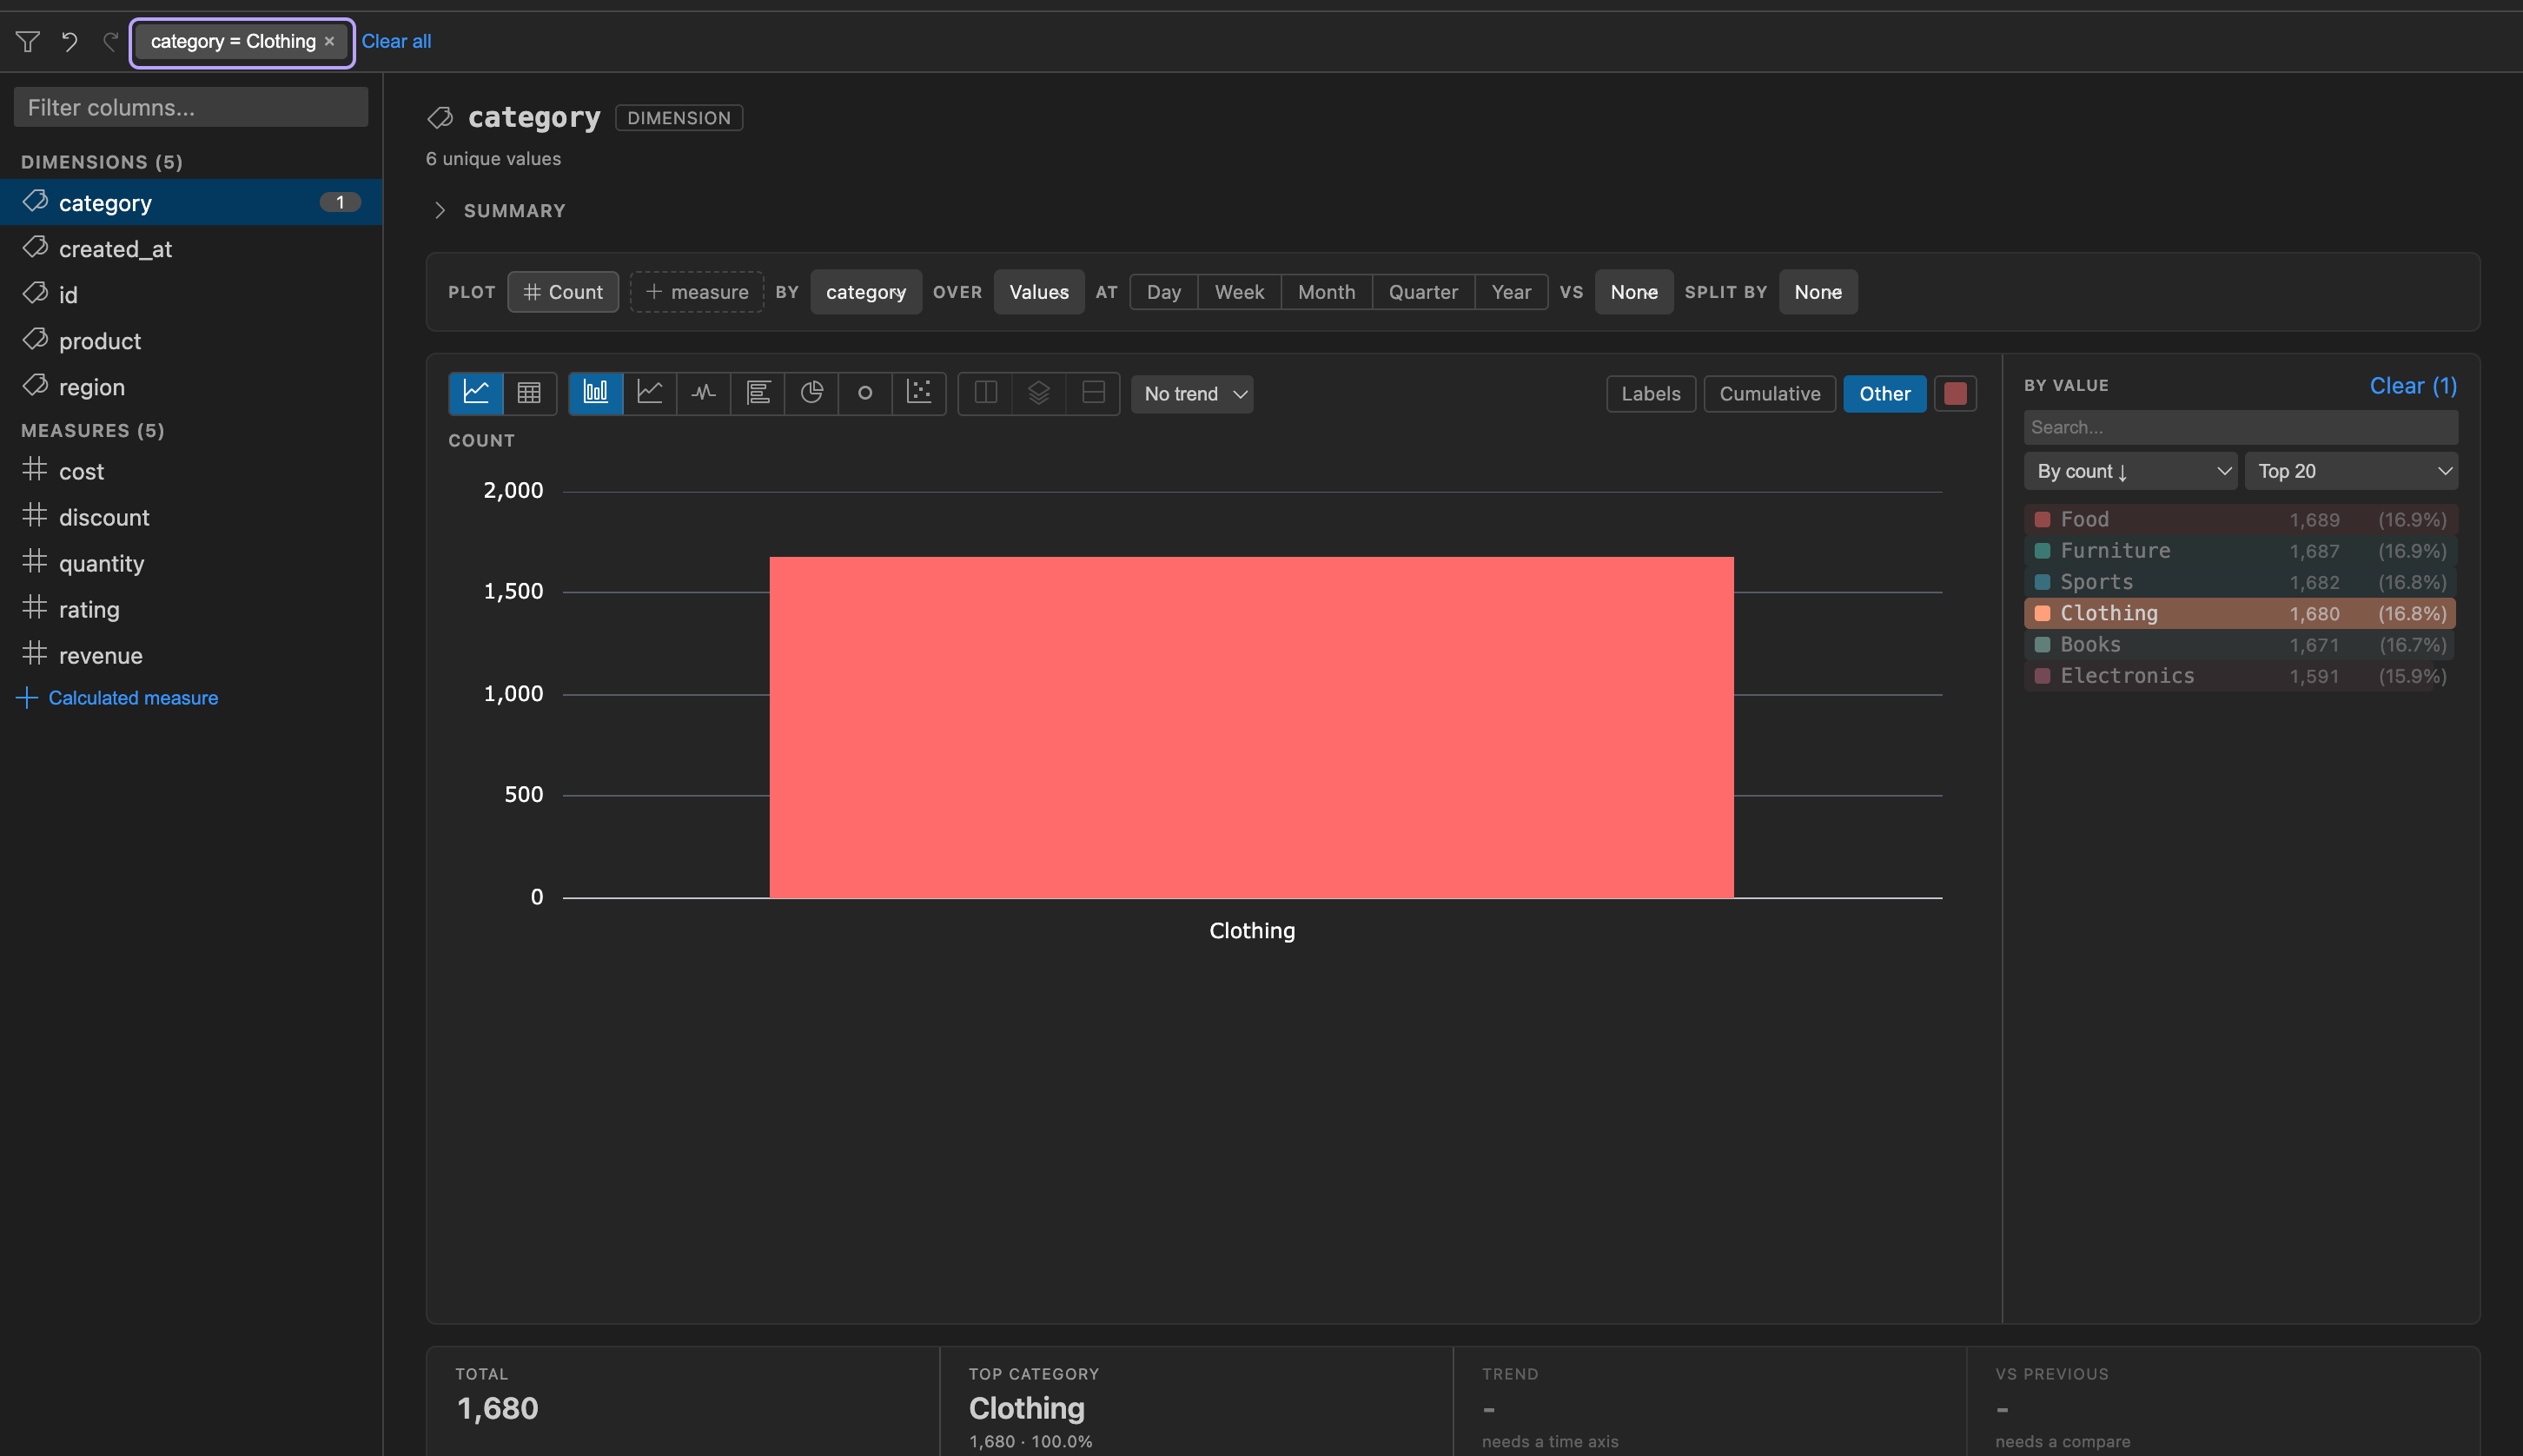
- Filter bar: Below the breadcrumbs, displays all active filters as removable chips with undo/redo buttons.
- Left sidebar: Columns grouped into Dimensions, Measures, and Relationships. Click a column to select it. The sidebar width is adjustable by dragging the resize handle.
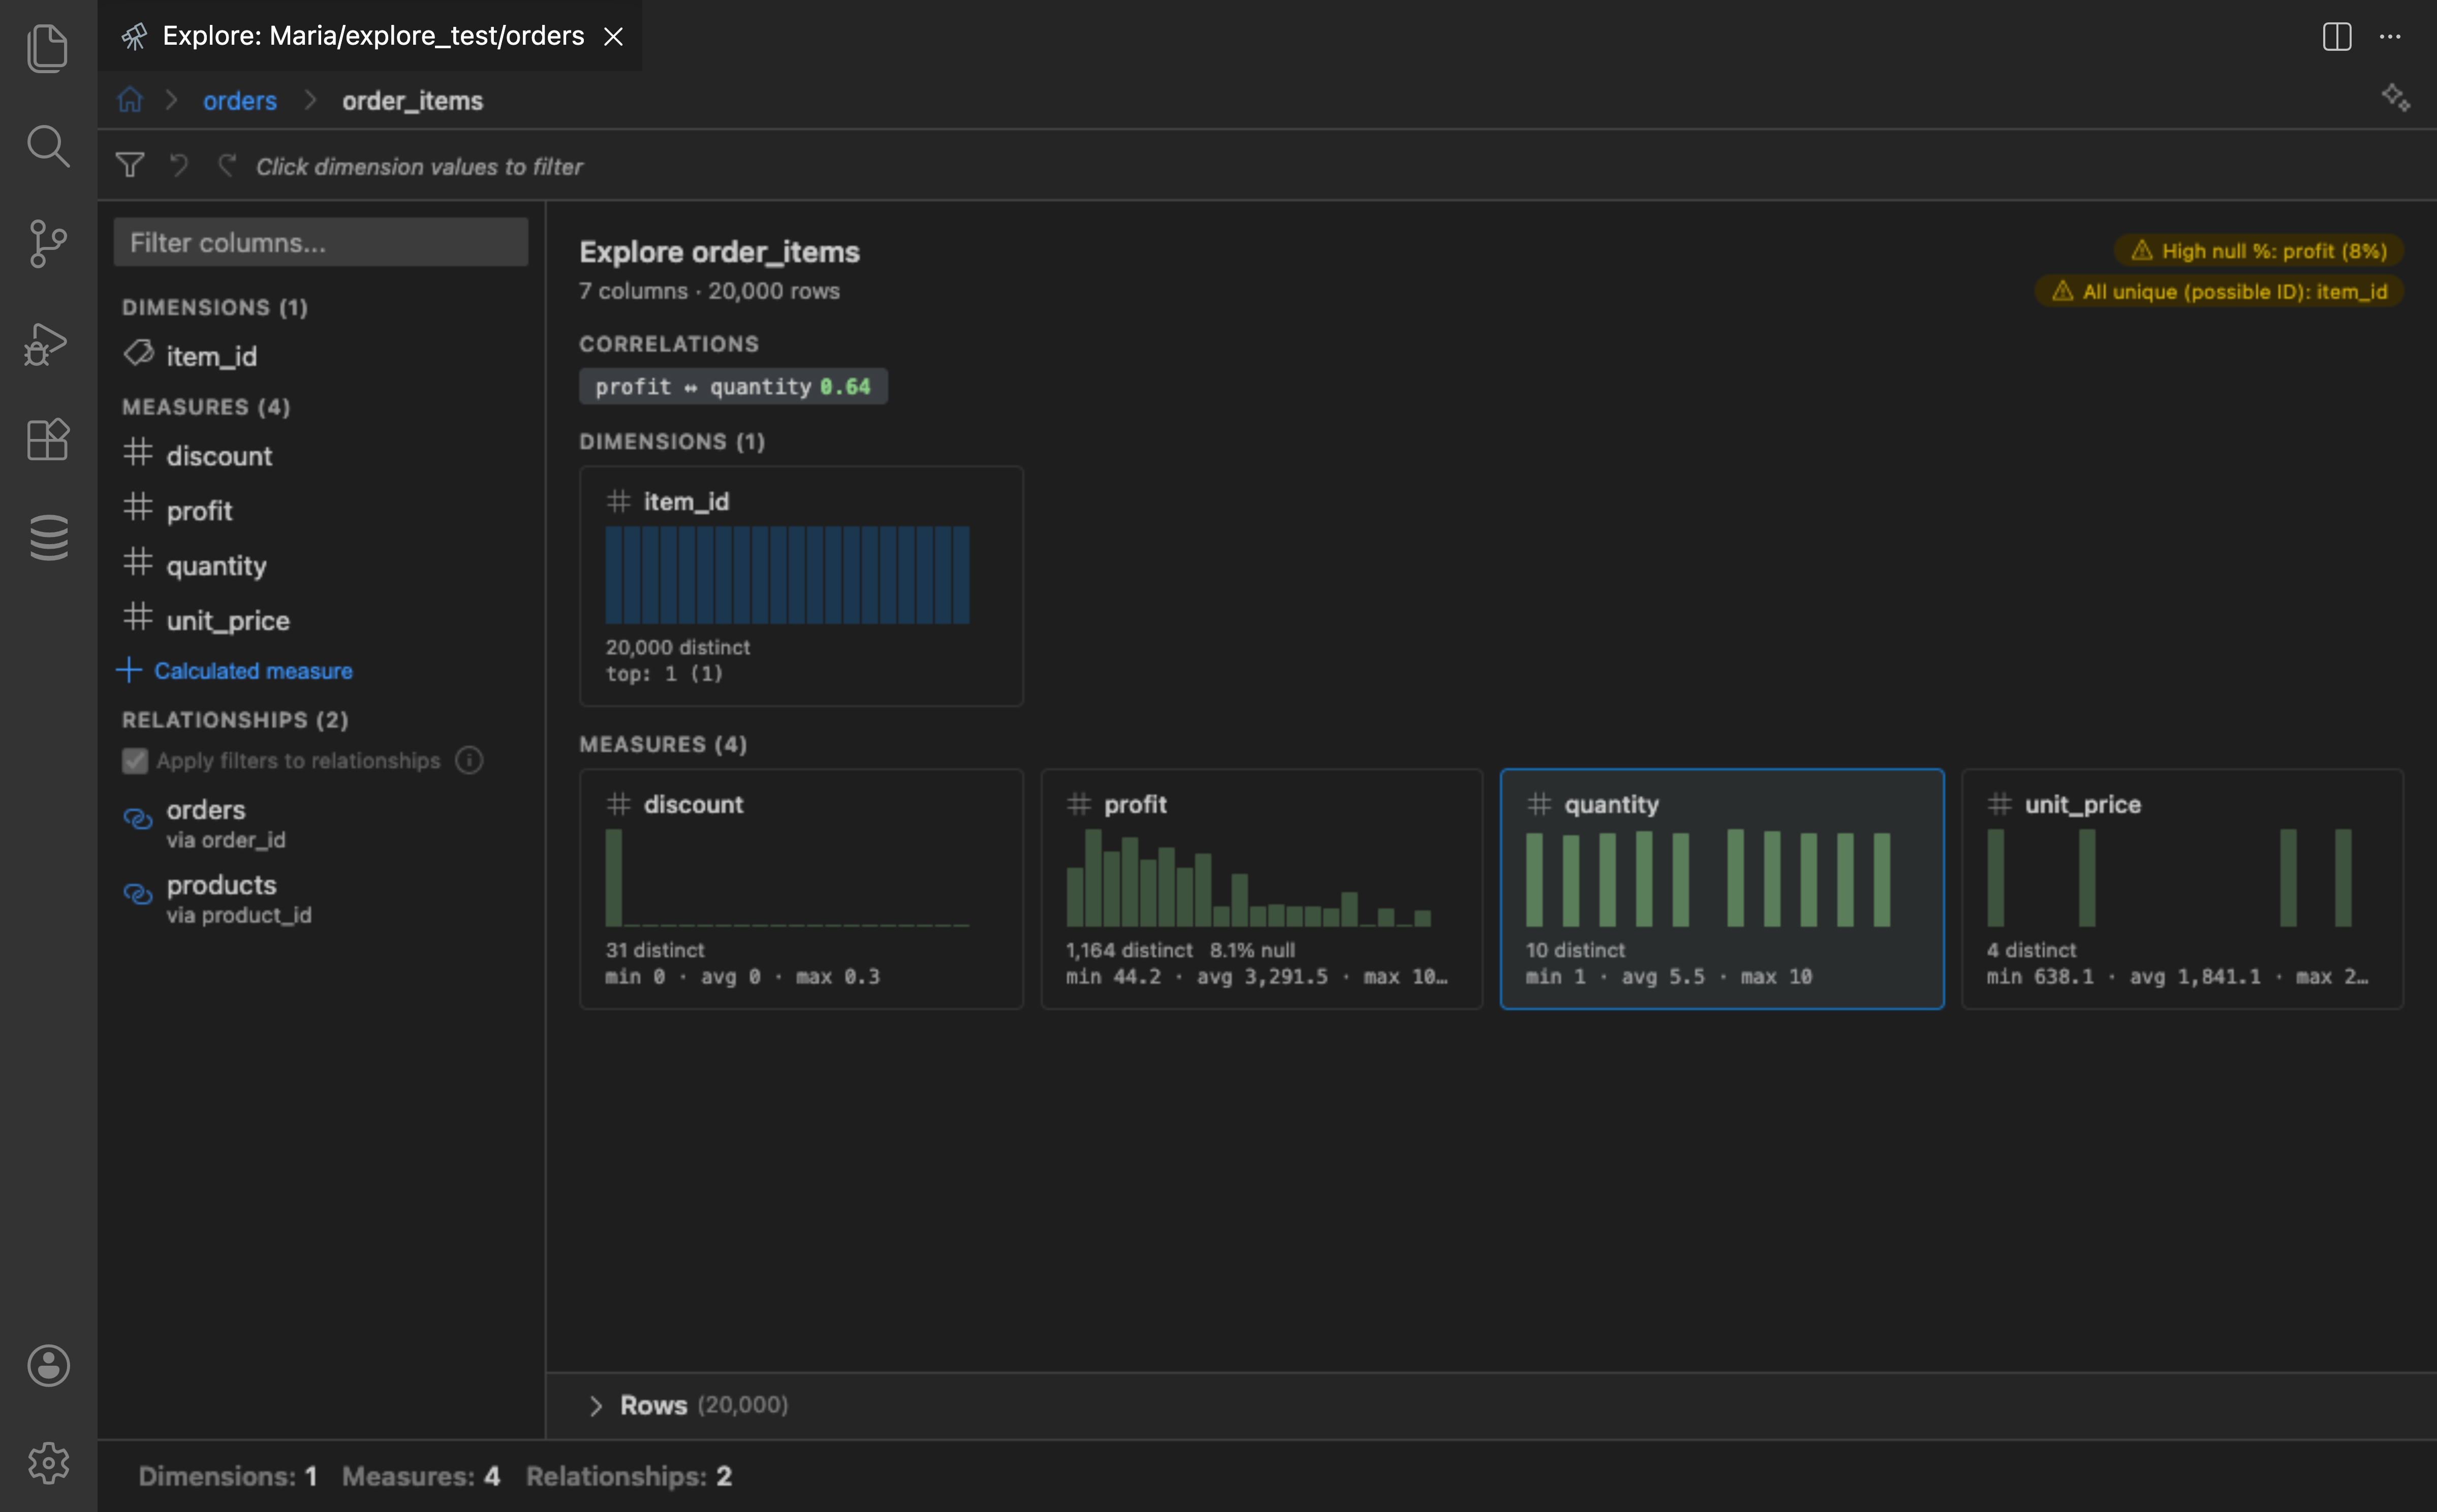
- Center area: Starts with profile cards for every column. When a field is selected, it becomes a chart immediately, with the same composer row controlling plot, grouping, time axis, comparisons, and split by.
- Row preview: A collapsible panel at the bottom of the center area showing filtered rows in a data grid.
- Status bar: Bottom bar showing dimension, measure, relationship, and filter counts.
Column Overview
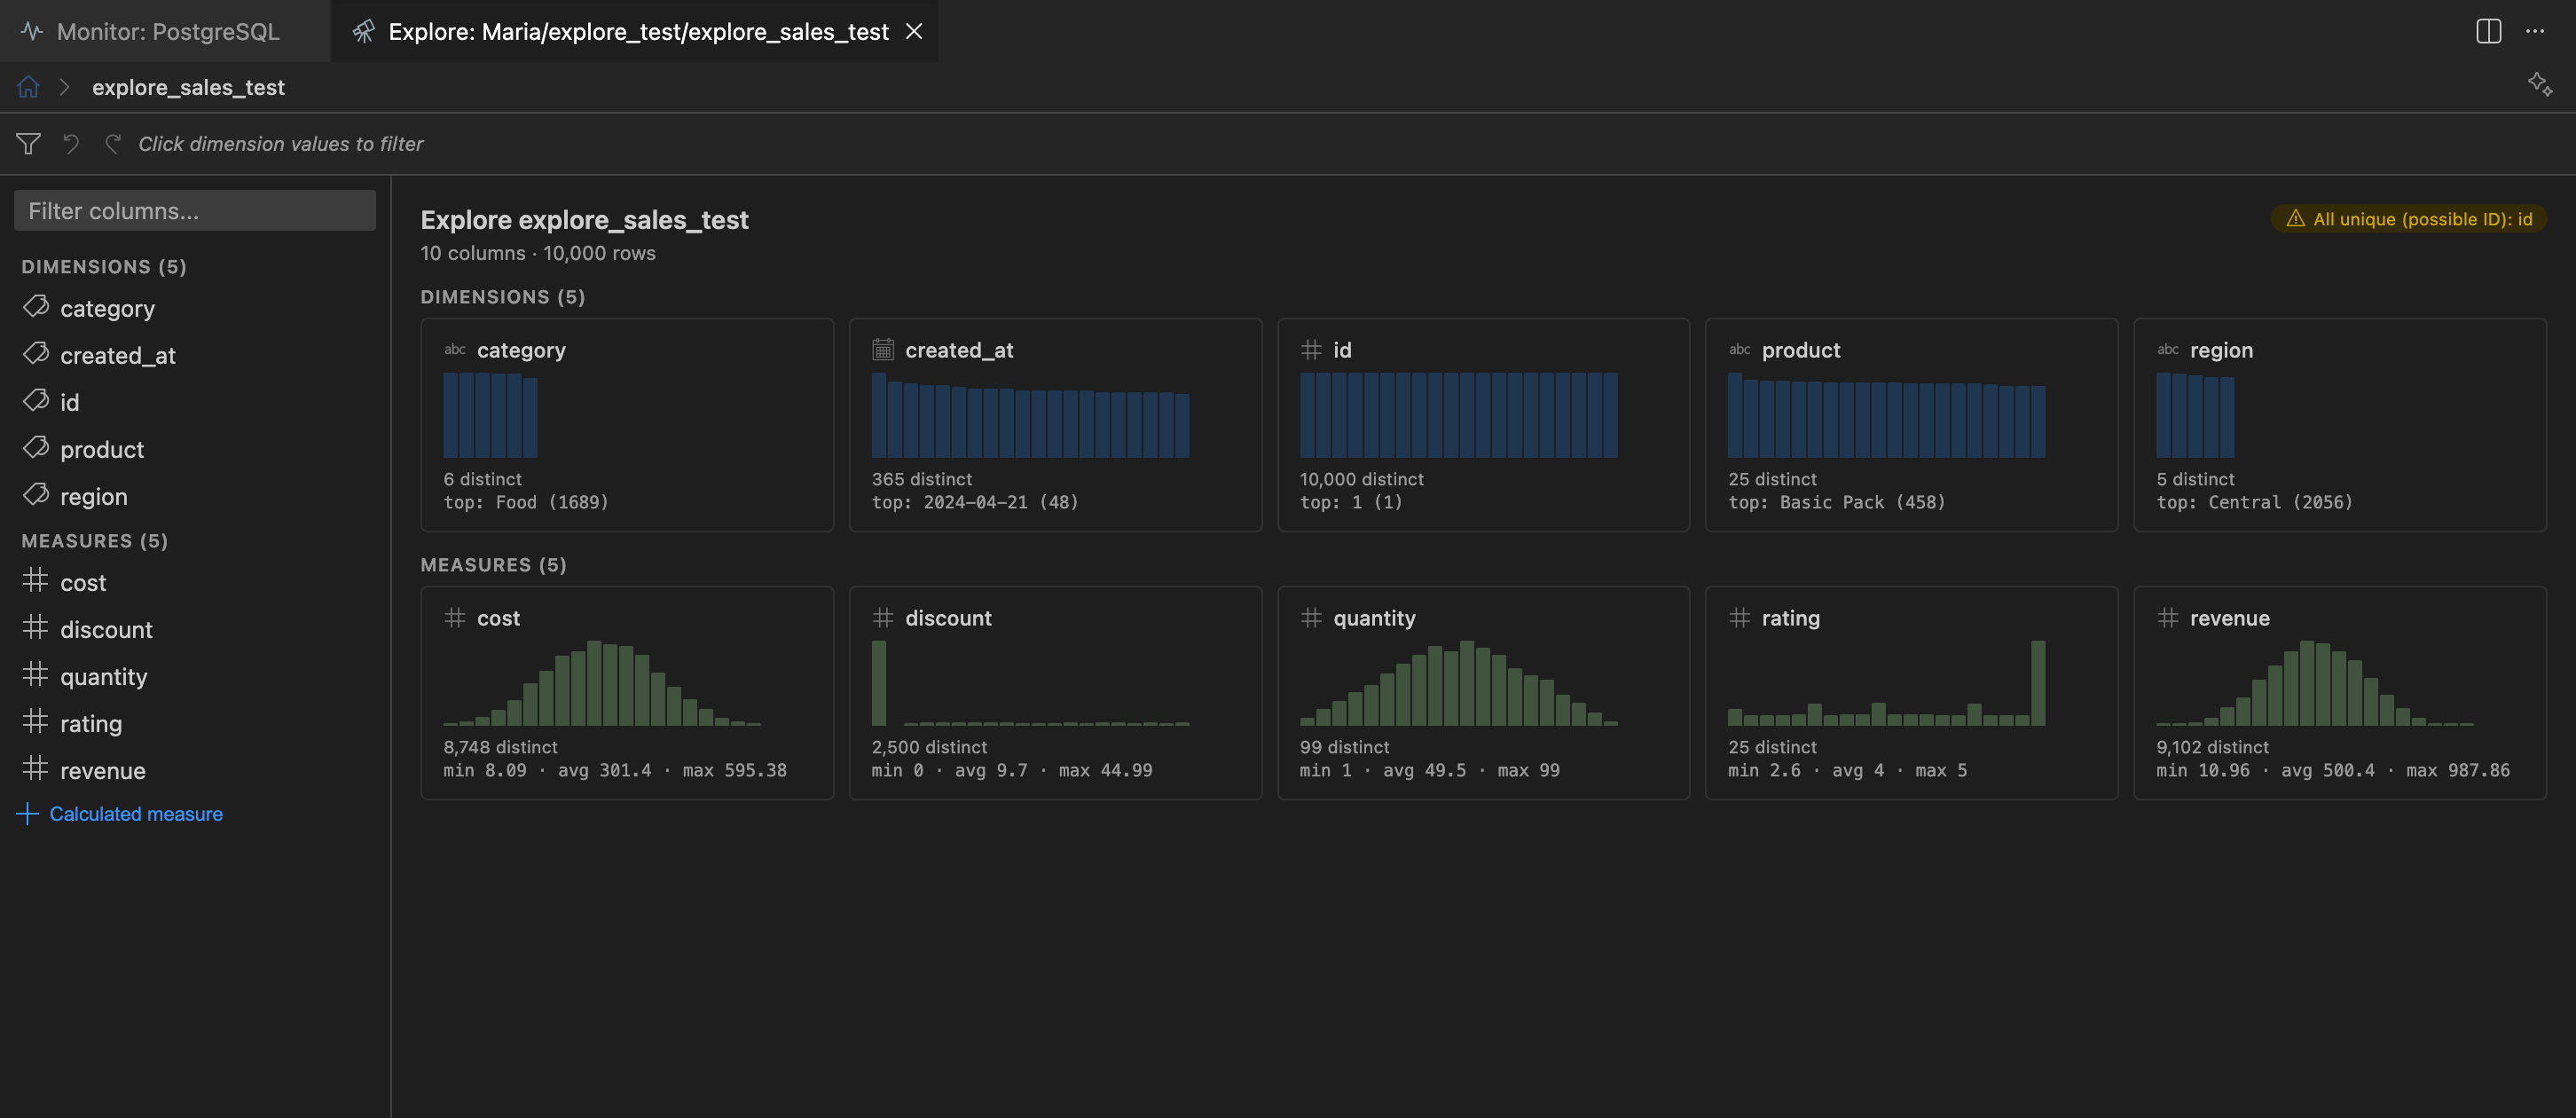
Section titled “Column Overview”When no column is selected, the overview page shows a card grid where each column is represented as a card containing:
- Column name with a type icon
- A mini sparkline histogram showing the value distribution
- Distinct count and null percentage
- A quick stat line (min/avg/max for measures, top value for dimensions)
The overview also highlights data quality alerts (columns with high null rates, constant values, or all-unique values) and shows correlations between measures with r-values.
Click any card to select that column and see its detail view.
Column Classification
Section titled “Column Classification”DBCode automatically classifies columns into two categories:
- Dimensions (categorical): Strings, booleans, dates, enums, and numeric columns detected as categorical via name heuristics (
_id,_code,_typesuffixes), FK metadata, or low cardinality. - Measures (numeric): Integers, floats, decimals, and money types suitable for aggregation. Detected IDs and foreign keys are excluded.
Filtering
Section titled “Filtering”Dimension Filters
Section titled “Dimension Filters”Click any value in the frequency list to add it as a filter. Multiple values can be selected. Active filters appear as removable chips in the filter bar at the top.
- Null values appear as “(null)” and are filterable like any other value
- A search box lets you filter the displayed frequency bars by substring (visual only, does not affect data filters)
Date Filters
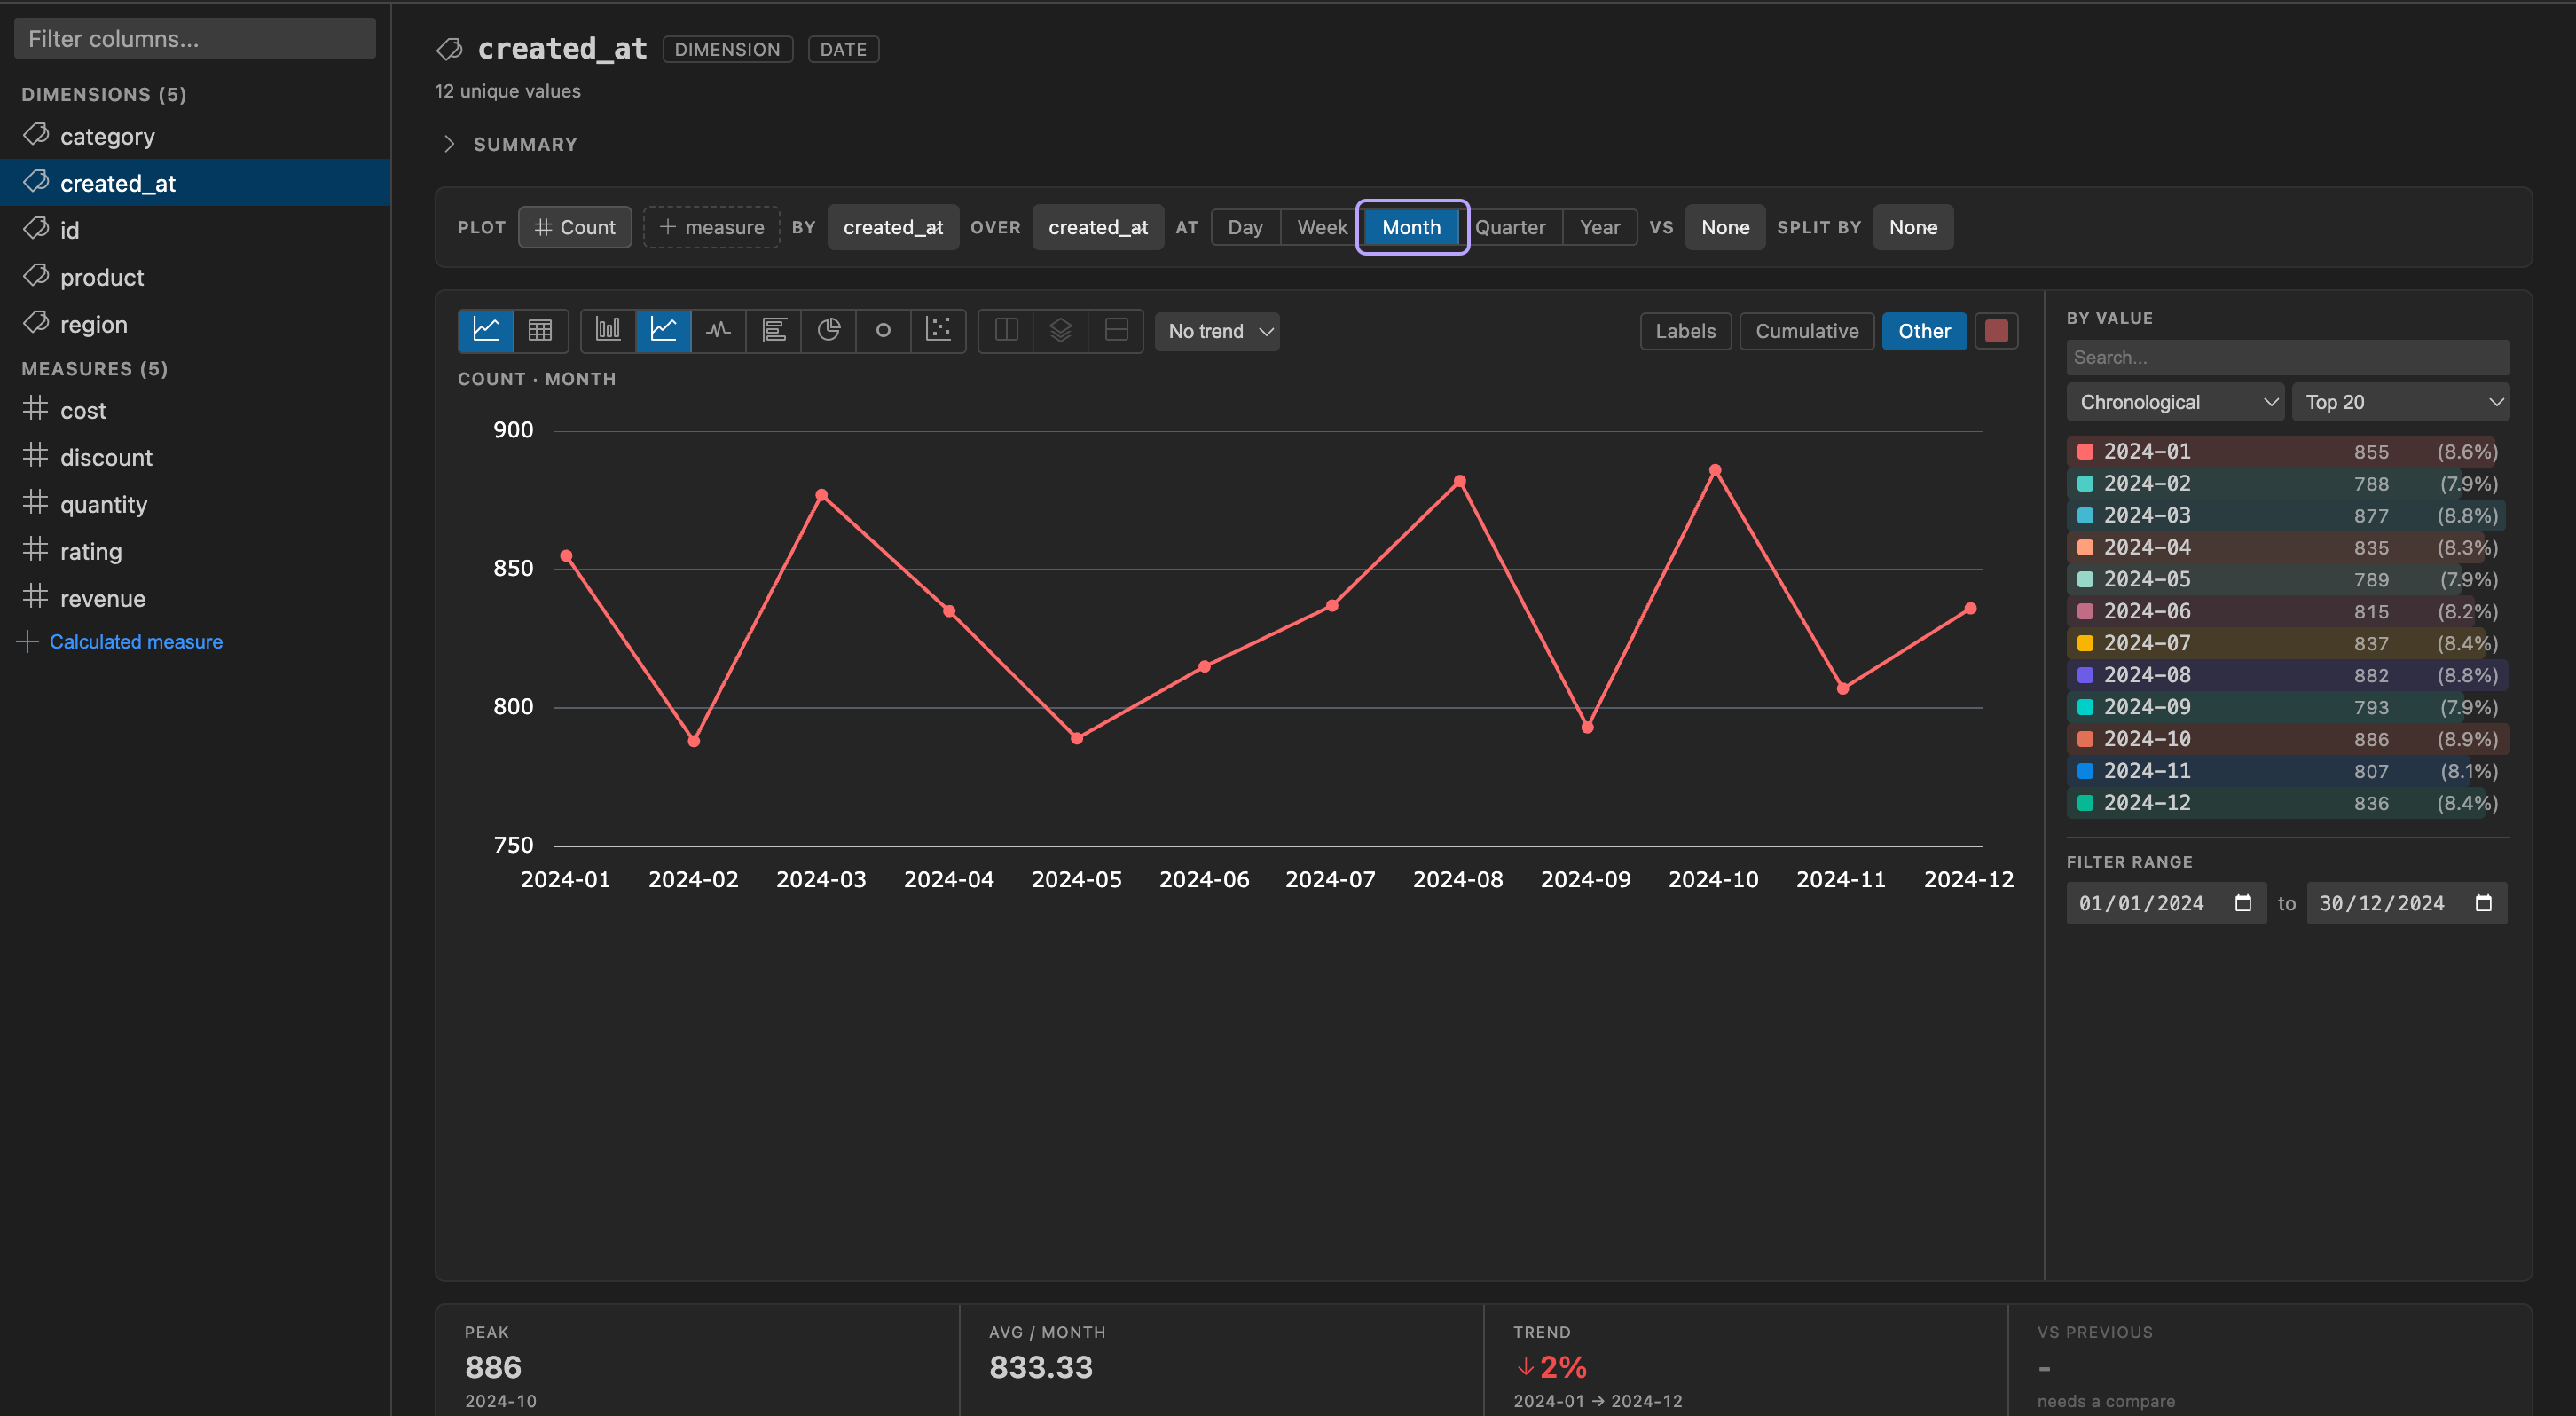
Section titled “Date Filters”Selecting a date dimension buckets its values using the composer’s at grain control - Day, Week, Month, Quarter, or Year. Changing the grain re-buckets the values and clears any previous date filters.
For a custom range, use the Filter range block at the bottom of the side panel: it seeds From/To with the column’s own min/max and applies a range filter as soon as you edit either date.
Measure Filters
Section titled “Measure Filters”Select a measure to see a range slider with a histogram backdrop. Drag the handles or edit the min/max inputs directly to filter to a numeric range.
Filter Bar
Section titled “Filter Bar”All active filters are shown as chips in a persistent bar below the breadcrumbs. Each chip is removable. Undo/redo buttons (up to 50 states) let you step back through filter changes.
Aggregation
Section titled “Aggregation”Select one or more measures and choose an aggregation function for each:
| Function | Description |
|---|---|
| Sum | Total of all values |
| Average | Mean value |
| Min | Minimum value |
| Max | Maximum value |
| Count | Number of non-null values |
| Distinct | Number of unique values |
Measures and grouping live in the plot composer: the by control sets the breakdown dimension (or Overall for a single aggregate), and the over control chooses the X axis - Values, or a date column bucketed at the at grain. See Over Time.
Chart Types
Section titled “Chart Types”The chart toolbar offers the following visualization types:
| Type | Best For |
|---|---|
| Bar | Comparing categories |
| Horizontal Bar | Long category labels |
| Line | Trends over time |
| Area | Cumulative trends |
| Pie | Proportions of a whole |
| Donut | Proportions with a center label |
| Scatter | Relationships between two measures |
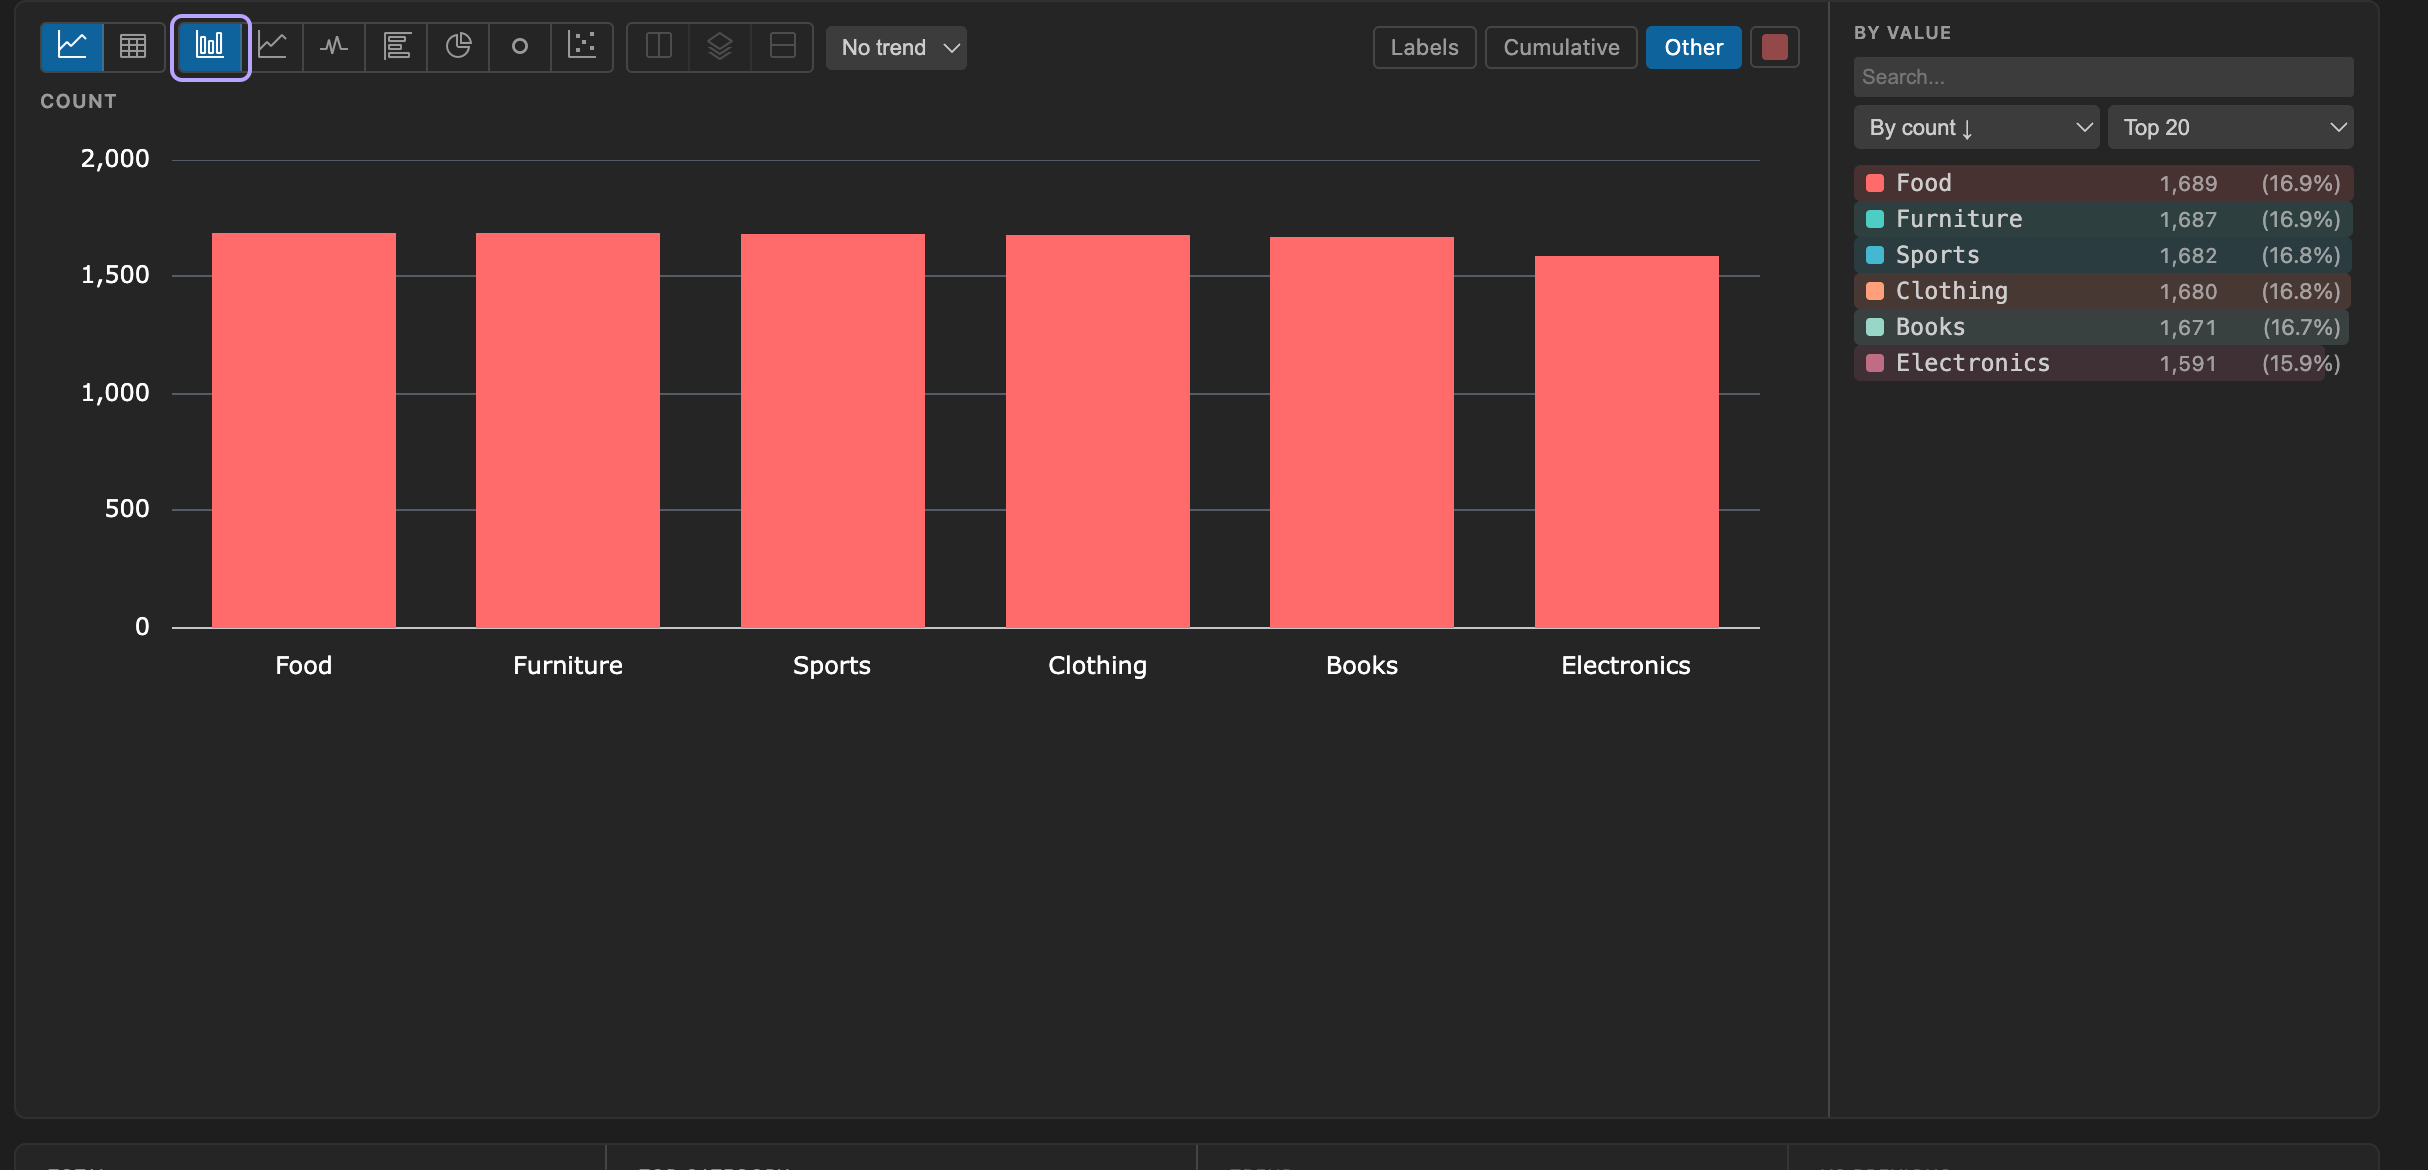
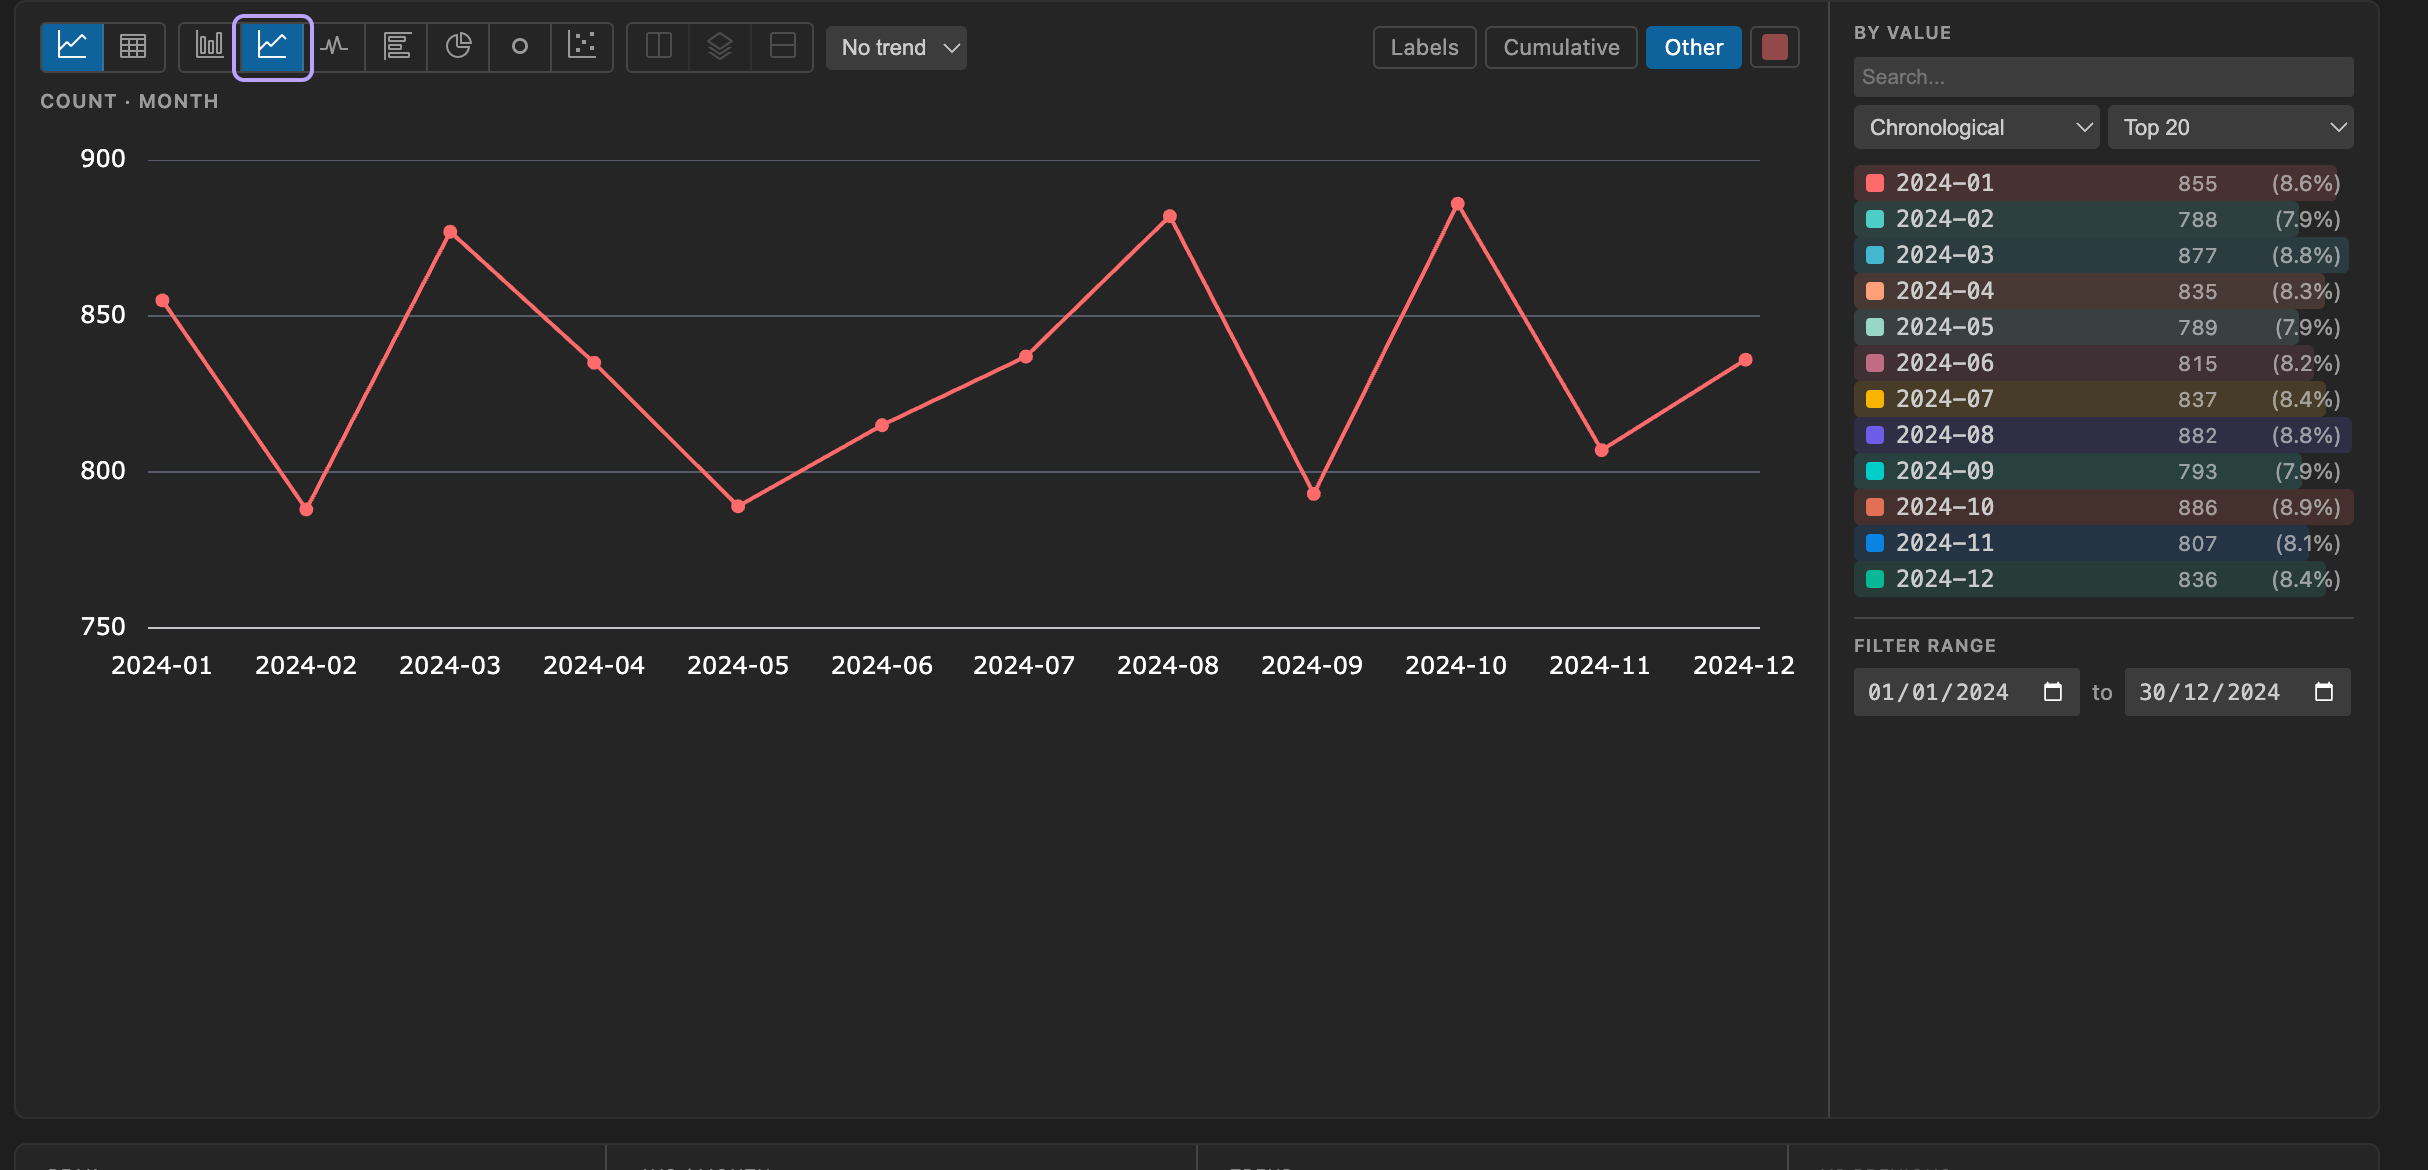
Chart Toolbar Options
Section titled “Chart Toolbar Options”The chart toolbar provides controls for customizing the visualization:
- Chart / Pivot: Switch between chart view and pivot table view
- Stacked: Stack series on top of each other (bar, area)
- Combined / Split: Overlay multiple measures on one chart or render them separately (requires multiple measures)
- Dual Axis: Use separate Y-axes for different measures (requires combined mode)
- Trend line: Select from a dropdown: None, Linear regression, MA-3, MA-5, or MA-7
- Labels: Show data values on chart elements
- Cumulative: Transform values into running totals
- Other: When Top N is active, aggregate remaining values into an “Other” entry
Chart Color Themes
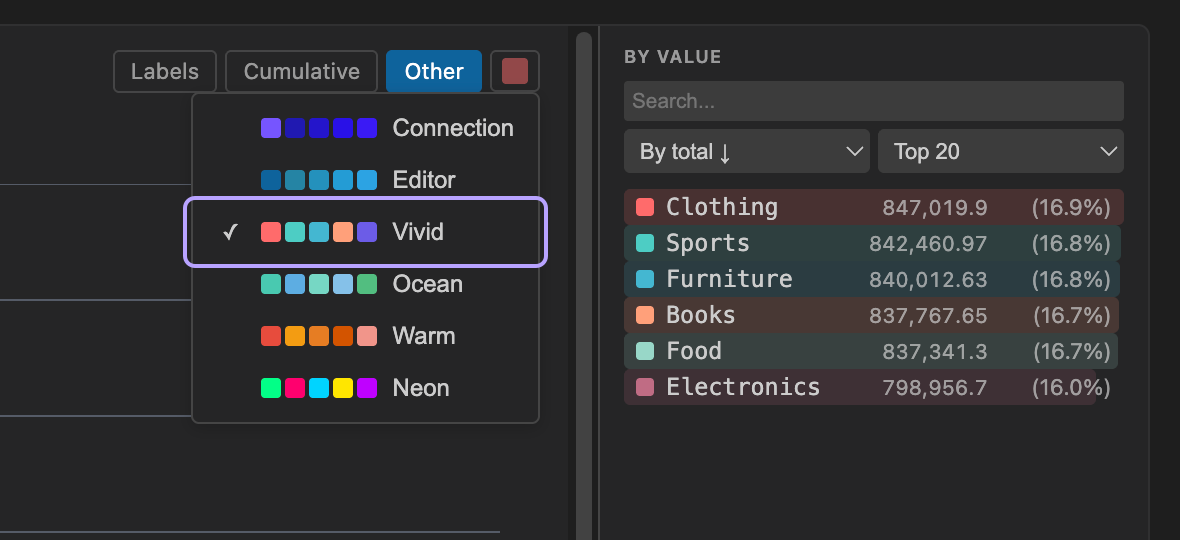
Section titled “Chart Color Themes”Click the palette icon in the chart toolbar to choose from six color themes:
| Theme | Description |
|---|---|
| Connection | Shades derived from the connection’s highlight color (default) |
| Editor | Shades derived from the editor’s primary accent color |
| Vivid | Bold, saturated, high-contrast palette |
| Ocean | Blues, teals, and cyans |
| Warm | Ambers, reds, and corals |
| Neon | Electric, bright colors |
The selected theme is remembered across sessions.
Split By (Multi-Dimension Grouping)
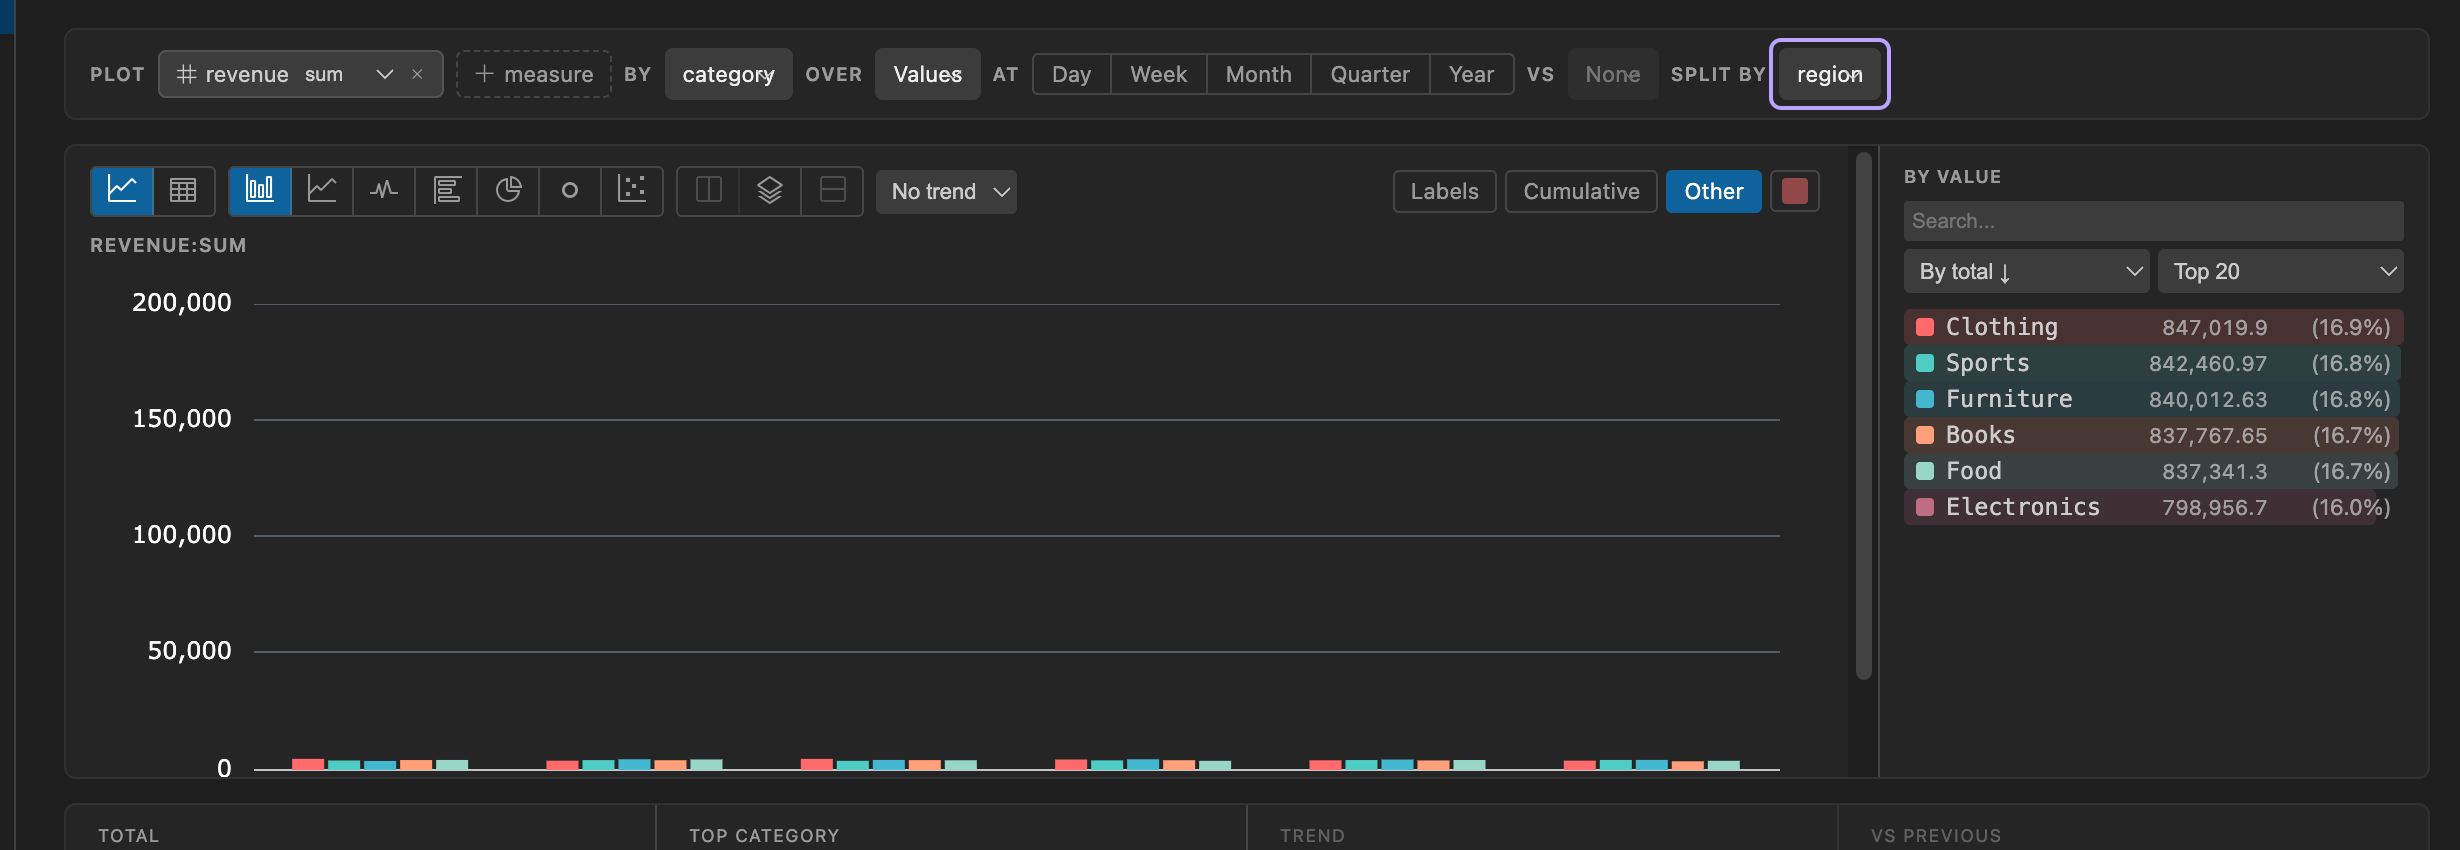
Section titled “Split By (Multi-Dimension Grouping)”The composer’s split by control adds a second dimension for sub-grouping. For example, group sales by month and split by region. The second dimension is limited to the top N values to keep charts readable; if it’s a date column, it buckets automatically at the same grain as the main axis. split by and vs are mutually exclusive - a comparison always shows the combined total, so adding a split removes an active comparison and vice versa.
When a second dimension is active, you can switch to a Pivot Table view that renders a cross-tab grid with row and column totals.
Over Time
Section titled “Over Time”Clicking any field opens a plot straight away, built from one composer row above the chart. The row is always the same six controls, in the same order - a control’s value changes, or it greys out with a reason, but it never appears, disappears, or moves:
Plot · by · over · at · vs · split by
- Plot - the measures to chart. You start with Count (for a dimension) or a Sum of the field (for a measure); add more with + measure and pick an aggregation for each.
- by - the primary breakdown. For a dimension this toggles between the clicked dimension and Overall (a single series); for a measure it is a dropdown of dimensions to break the measure down by.
- over - the X axis: Values, or any date column in the table. The option list is the same for every field, so a date dimension can be plotted over itself or over a different date column.
- at - the grain (Day, Week, Month, Quarter, Year). It drives time bucketing when over is a date column, and value bucketing when over is Values but the selected dimension is itself a date. It greys out with a reason when neither applies.
- vs - a comparison against the previous period or the same window a year back (year-over-year is not offered at week grain, since ISO weeks don’t align across years). It’s available whenever it can act - a single measure, no split by, and a date column somewhere in the table - even while over is still on Values; choosing a comparison there switches the axis to time automatically, at the grain DBCode judges best for the loaded data.
- split by - an optional second dimension. Over time this renders small multiples (one chart per split value, sharing a single time axis and color order); over Values it sub-groups each bar. Mutually exclusive with vs.
Landing rule: click a string dimension and it lands on its own values (ranked bars); click a date dimension and it lands on its own timeline; click a measure and it lands over the best date column in the table when one exists, falling back to Values otherwise. DBCode prefers date columns named like created, _at, timestamp, or date. A categorical breakdown turns each value into its own color-matched series, mirrored in the By value list beside the chart (click a value to filter); that same side panel carries the Filter range block at its bottom for the date column at governs, seeded with that column’s own min/max. When several measures are selected, each gets its own chart.
Under the plot, an insight strip summarizes the series: in time mode, Peak (and when it occurred), Avg per grain, Trend (first-to-last change), and Latest; over Values, the grand Total and the leading value’s share.
Buckets are aggregated entirely from the rows already loaded into the panel - no extra query is sent - so use the row limit when opening Explore to control how much history is charted.
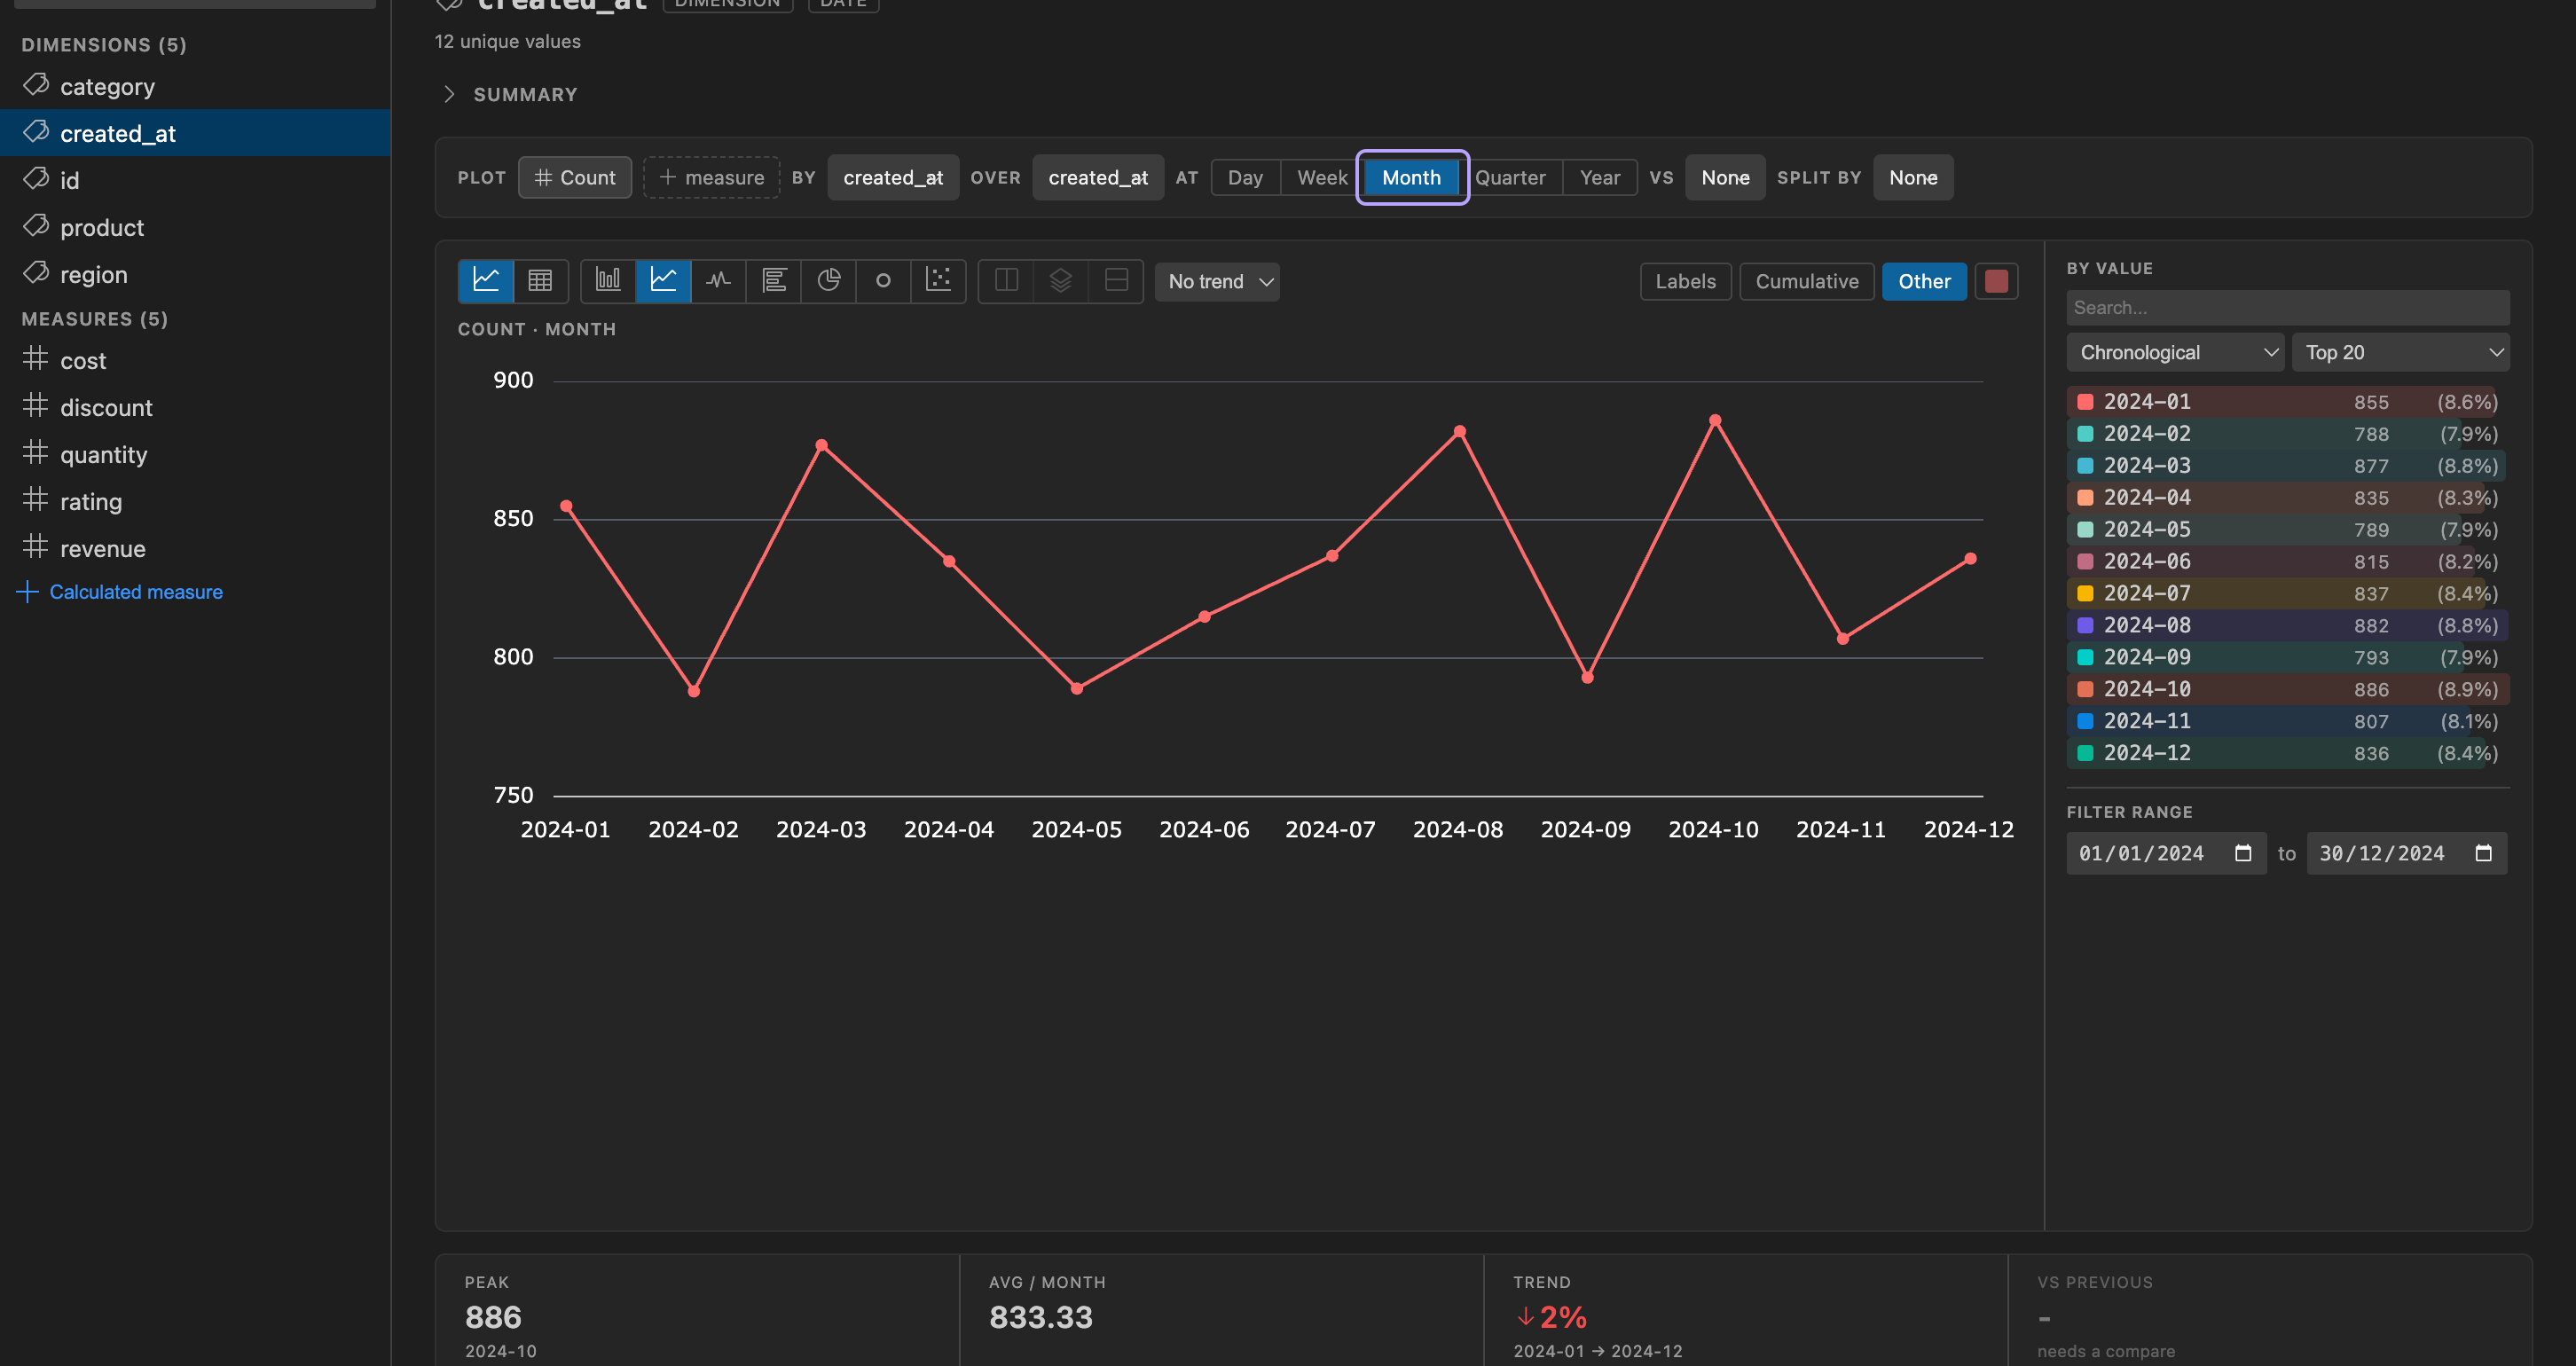
The comparison renders as a dashed grey line - always the combined total for the window, regardless of any breakdown - and the insight strip’s vs previous row reports the change.
The most recent bucket is still filling in, so it renders dimmed and labeled “so far”; trend and comparison math only consider complete buckets, so the in-progress one never skews the numbers.
If the chart was built from a row-limited snapshot, a warning appears on the chart noting how many rows it’s based on, with a one-click option to re-run at a higher limit.
Statistics
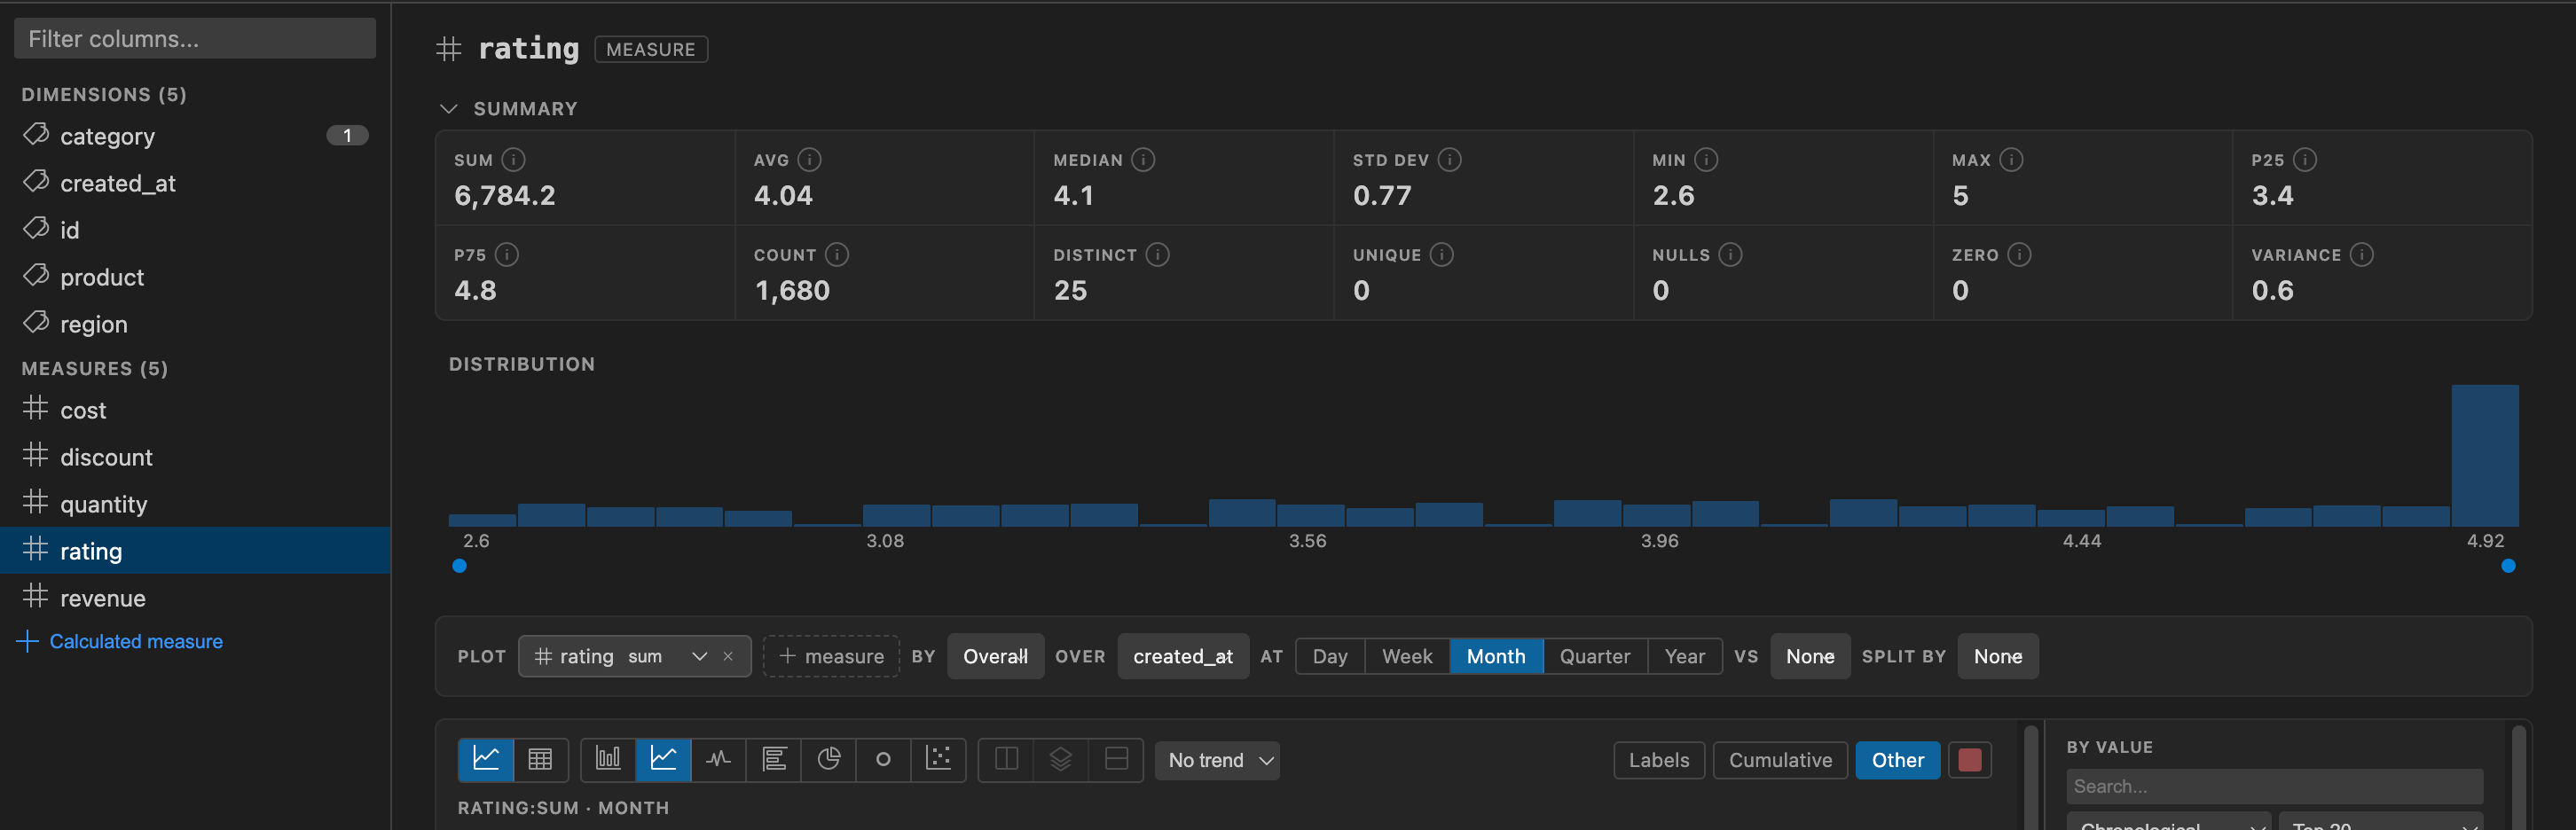
Section titled “Statistics”When a measure field is selected, the detail view shows a summary grid with:
- Sum, Average, Median, Standard Deviation
- Min, Max, p25, p75
- Count, Distinct Count, Null Count, Variance
A distribution histogram (~15-20 bins) is also displayed.
Calculated Measures
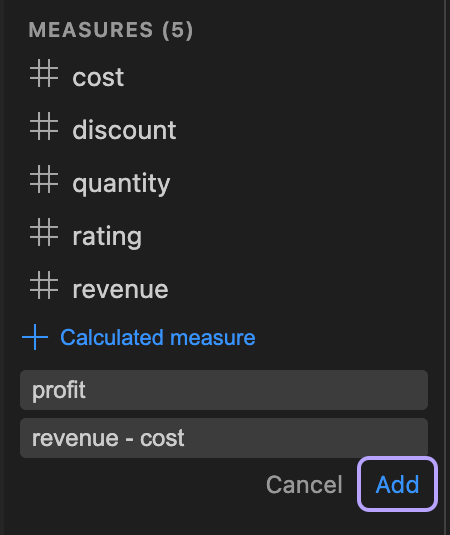
Section titled “Calculated Measures”Click the + button in the Measures section of the sidebar to create a calculated measure. Enter an expression using column names (e.g., price * quantity). Autocomplete suggestions are provided as you type.
Row Preview
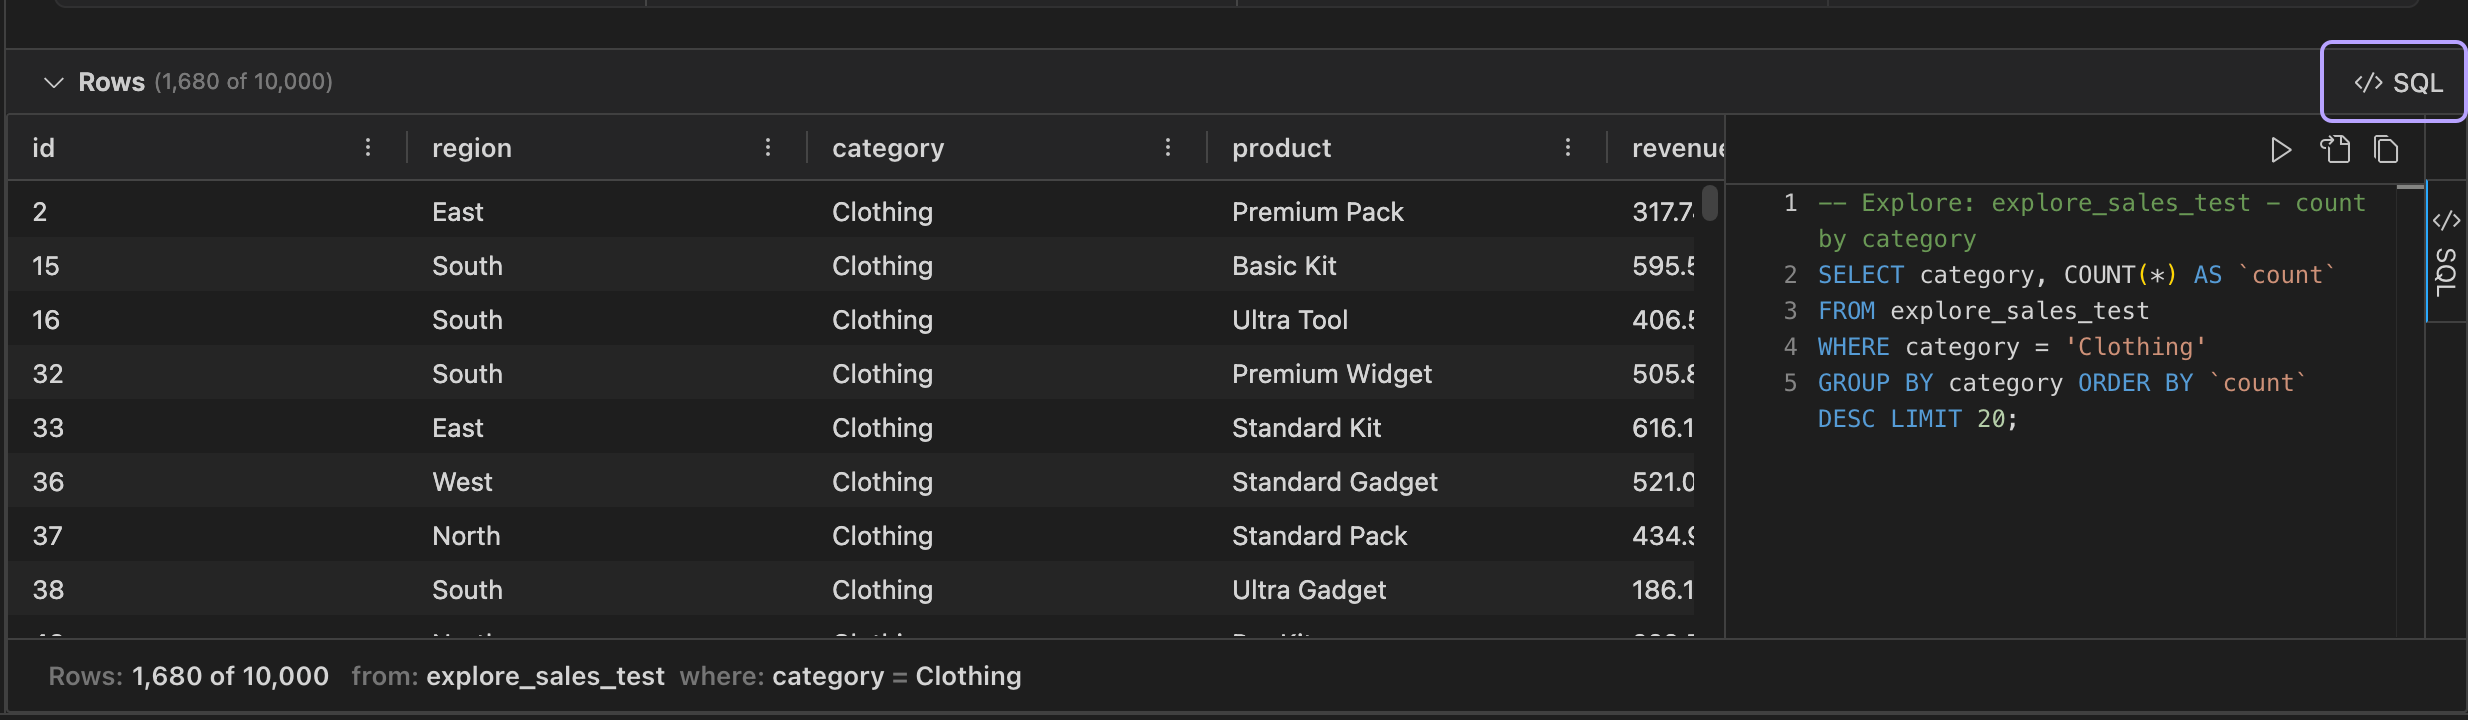
Section titled “Row Preview”The Rows section at the bottom of the center area can be expanded to show the current filtered rows in a data grid. When exploring a table or a query result on a SQL connection, the row preview includes a SQL panel that shows the generated SQL for the current exploration state, with options to open the SQL in the editor or execute it directly.
Open as SQL
Section titled “Open as SQL”Every chart you compose has a SQL equivalent. Open the Rows panel and choose the SQL side panel to see the query - measures, grouping, time grain, filters, and calculated fields compile to the SQL dialect of your connection. Open it in an editor to tweak or run it.
When Explore is working from a capped snapshot, the row-limit warning offers to open the full query so you can run it server-side over all rows.
Chart Interaction
Section titled “Chart Interaction”Clicking a chart data point toggles a filter for that value, allowing you to drill into a specific category and see how it affects the rest of the exploration.
On a time chart, drag across the plot to zoom into that date range - the chart scales to the selection so you can inspect a busy stretch of the timeline up close. Double-click the chart to zoom back out to the full range.
Sort and Top N
Section titled “Sort and Top N”- Sort: Order values by count (ascending/descending), alphabetically (A-Z, Z-A), or chronologically for date dimensions
- Top N: Limit the display to the top 5, 10, 20, or 50 values. Remaining values are collapsed into an “Other” entry when the Other toggle is active.
FK Drill-Down
Section titled “FK Drill-Down”When foreign key relationships are detected (or inferred), they appear in the sidebar under Relationships. Click a relationship to drill into the related table, carrying the current filter context.
- An Apply filters to relationships checkbox controls whether the drill uses only filtered rows or all rows
- The breadcrumb bar tracks the full drill path, and each segment is clickable for back-navigation
- Column definitions and relationship metadata are preserved at each level
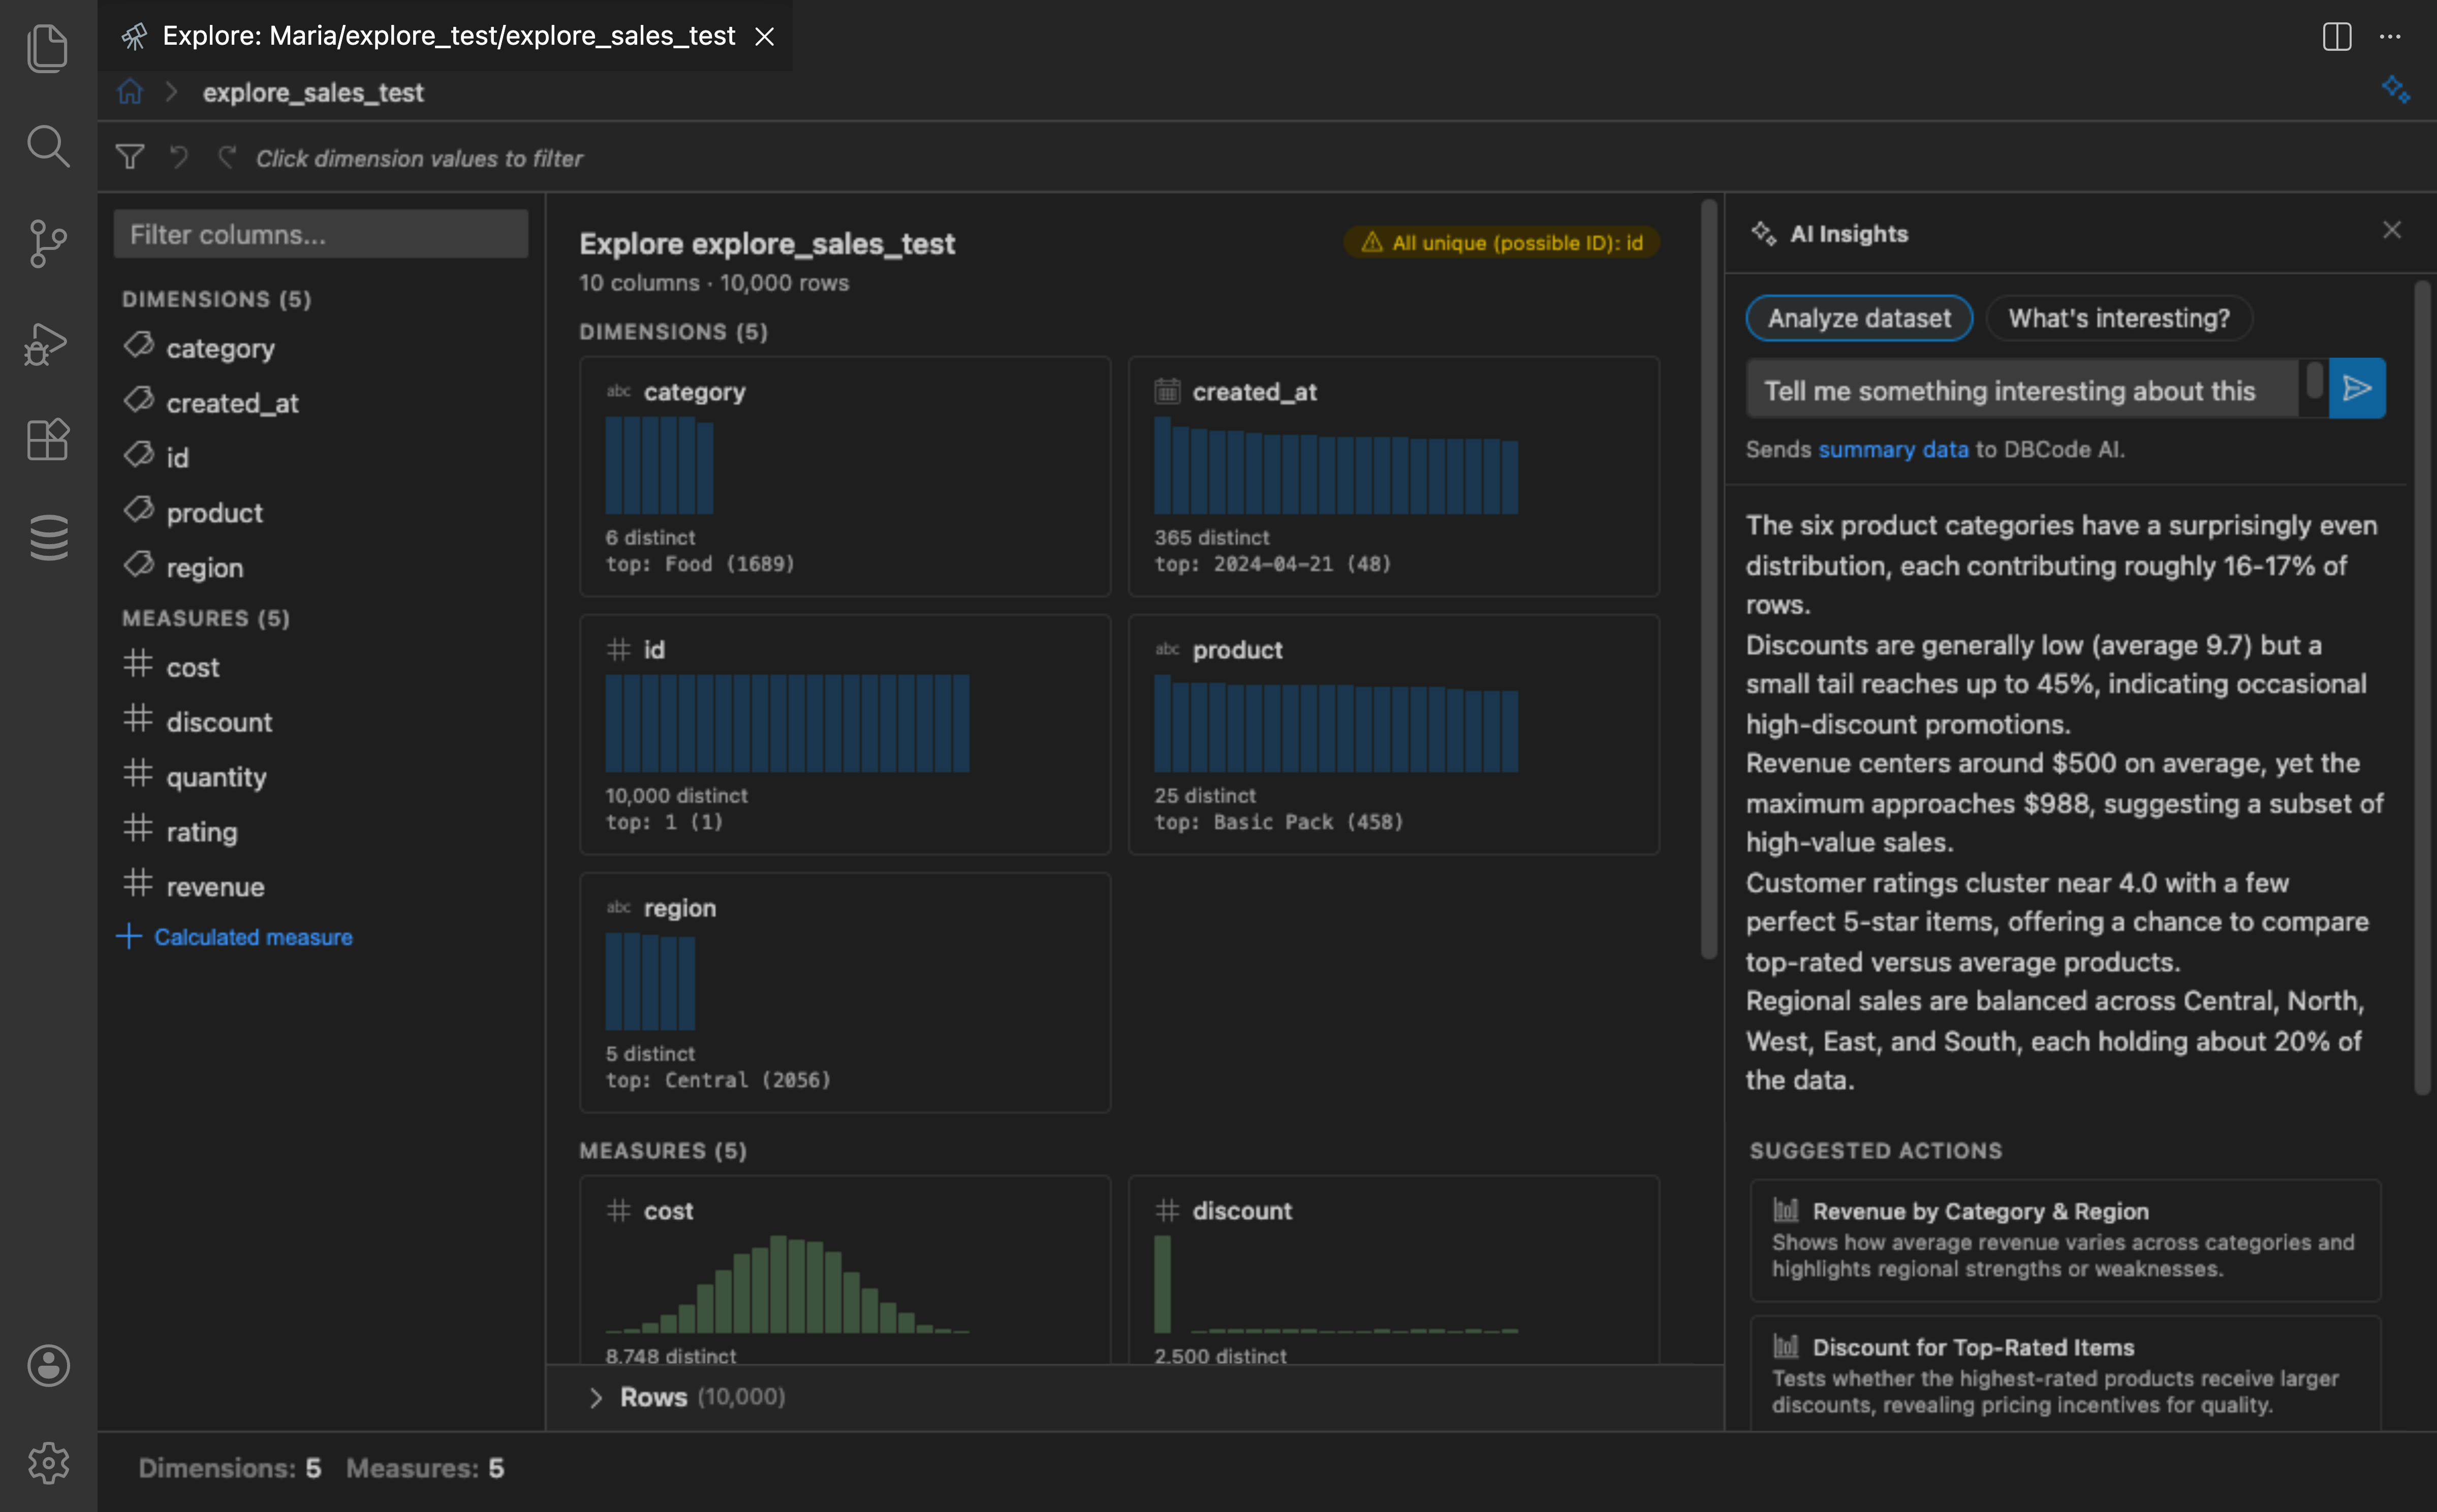
AI Insights
Section titled “AI Insights”Click the sparkle icon in the breadcrumb bar to open the AI assist panel. DBCode sends a compact summary of your data (column types, cardinality, top values, null rates, correlations) to your configured AI provider and returns:
- Insights: Observations about your data
- Suggested actions: Clickable buttons that apply exploration actions (select fields, add filters, set measures, drill into relationships)
No raw data rows are sent to the AI provider. Summary data (column types, value distributions, null rates, some distinct values) is sent. You can view exactly what is sent by clicking the Summary Data link in the AI assist panel.